creativecommons.org
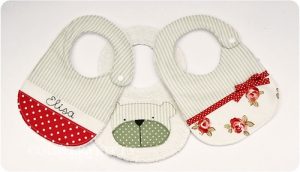
At an early age, a bib is an indispensable part of a child’s wardrobe. Moreover, it is advisable to have several options in stock. These products get dirty most often and actually require daily washing. Some models are worn by babies up to six to eight months. They are small in size and do an excellent job of absorbing milk and water. Today you can find a variety of products: colored, plain, decorated with various designs and patterns. But, despite the large selection, many mothers prefer to sew a bib with their own hands. This is a great way to bring creativity to life and delight your baby with a new thing.
Before you sew a bib for your baby, you need to prepare the necessary fabrics and tools. The pattern of the product is very simple. There are many variations found on the Internet; you can print them out and use them in your work. Layouts are often made independently. This allows you to come up with a non-standard shape or size of the bib.
DIY baby bib, what fabric to choose
Good, durable products are made from knitwear, fleece, and cotton material. Experts also suggest sewing a baby bib from plush or terry cloth. These fabrics are able to absorb small amounts of moisture.
The second option is to use a material with water-repellent properties. These include all types of oilcloth and raincoat fabric. Many manufacturers now combine two types of materials. When sewing, a second layer is added to the product. For the top layer, choose a fabric that absorbs moisture. We put a layer of oilcloth underneath. In this case, the baby's clothes will not get wet.
To sew a bib, you need to select buttons, several ribbons and snaps. External seams are covered with bias tape. It is advisable to avoid small, decorative elements. They make it difficult to wash the product. Also, a small child may tear off and swallow objects.
How to sew a bib for a baby - DIY bibs for children
creativecommons.org
We offer you some tips on how to properly sew a bib for your baby:
- When choosing a size, it is important to take into account the age and shape of the baby. The miniature version is ideal for a child aged several months. For older children, a triangle-shaped model is suitable.
- When calculating the width of the product, it is necessary to make it a couple of centimeters less than half the volume of the chest. Otherwise, the child will not be able to move his arms and will be capricious and nervous.
- For children who are learning to feed themselves, a long bib is suitable. It will cover your knees and protect your clothes from falling food.
- For babies, a bib up to chest level is enough.
- When measuring the cutout, you should choose the best option that will not put pressure.The neck should fit slightly, but not loose.
- When making a bib using a finished pattern, the dimensions must be checked with the child’s measurements.
- Fashionable bibs in the form of triangles are suitable not only for the home. They look stylish, reminiscent of bandana scarves. The model is tied at the back, leaving a relatively large triangle of fabric at the front.
How to sew a bib - master class
To sew a children's apron you will need several types of material:
- The front side of the product is made of chintz, decorated with pictures and patterns.
- The edge is also processed with chintz, for example, in small peas or flowers.
- The reverse side is made of a plain material.
- The inner layer is white, plain.
In addition to the fabric, you need to prepare pencils, paper, scissors, pins and threads. The pattern is drawn on a small sheet of paper. You can get by with a half pattern, since the product is symmetrical. After the layout is cut out, we begin work on the bib. Step-by-step instruction:
- We fold the chintz in half with the front side, put a paper model on it, trace it along the contour, and cut it out. If you straighten the fabric, you will see the finished front part of the product.
- The plain material for the back side is folded by analogy, the pattern is redrawn and a finished bib element is obtained.
- We do the same with white matter.
- We place the resulting parts on top of each other so that they carefully match along the edges. We sew by hand or use a machine.
- The polka dot material will be processed. We cut a strip along an oblique line about 27 centimeters long and four centimeters wide. We make several stripes, then sew them together. The result should be a flap up to a meter long.
- This strip is used to trim the neck and edges.To ensure that it turns out smoothly and that the material does not move, we pin it with pins and then stitch it.
- The remaining part of the strip is the ties; they should not be too long. To remove the width of the stripes, we sew them along the edges.
 0
0