izi.ua
Homemade toys always look original and unconventional. Every master can realize his ideas, choose colors, size and style according to his own taste. That is why such crafts are exclusive and unique. You can sew toys with your own hands from a variety of materials - silk, ribbons, fur or regular cotton. Recently, felt has become especially popular among craftswomen. It is easy to use, does not require edge processing, is elastic and soft. For example, a do-it-yourself felt dog looks like a real one if the pattern is chosen correctly.
A felt dog template can be found on the Internet. The websites offer many patterns for every taste. To decorate felt products, you can use a variety of decorative elements. Decorations can be attached to felt using glue - it adheres well to the material.
How to make a dog out of felt - tricks when choosing material
Like all felt toys, the dog is made from multi-colored elements.The optimal material for such a craft will be gray, black, red, white and beige. The felt dog face will require a small amount of red material to make the tongue. The stores sell felt of different compositions. There is a completely natural fabric based on wool or down. They also offer mixed options - natural fibers are combined with acrylic or other components. The second option is optimal for creativity. Its advantages:
- Softness, elasticity;
- There are no spiky wool fibers;
- Does not attract moths;
- Well kept.
The fabric is sold in pieces of various shapes and sizes. The thickness of the material also differs. If the felt dog pattern is small, it is better to choose a canvas with a thickness of one to two millimeters. Then it will be easier for the master to make the craft three-dimensional. The material is more flexible. The range of colors is quite large. You can choose any shade to your liking. A do-it-yourself felt dog is not always made in natural shades. It can be made in bright colors. For example, in pink, light green, yellow tones. This toy will look festive and is suitable for decorating a Christmas tree or gifts.
DIY felt dog with patterns - general principles of sewing
izi.ua
Regardless of the pattern, a felt dog toy is sewn according to general rules and principles. Some master classes contain special tricks, but basically the general sewing scheme applies. Key materials:
- The required number of felt scraps.
- Scissors, thread, needle.
- Paper, marker or felt-tip pen.
- Ballpoint pen, decorative elements.
We choose what kind of dog will be made of felt - we select a template on the Internet and print it out on a printer. We cut out all the details along the contour, apply them to felt, and trace them with a ballpoint pen.It is difficult to draw on this fabric with a simple pencil - it is practically invisible on the material. Next we proceed according to the scheme:
- Cut out all the pattern elements from felt. We sew them together sequentially. Various hand sewing seams are used. Large and medium-sized crafts are best sewn on a sewing machine.
- When sewing two sides of an element, it is necessary to leave a small gap for stuffing. We fill the toy with cotton wool, padding polyester, felt or other material.
- When filling the toy, we use an auxiliary object - a pencil, a wooden stick, a pen. This will help sort the stuffing into all parts without leaving any gaps.
- After filling is completed, we sew up the gap.
- We sew on the external elements - eyes, nose, tongue, ears, etc. It all depends on the chosen pattern.
- We decorate the toy with a collar, ribbons, rhinestones and other elements.
DIY felt dog with patterns - quick sewing methods
A cute felt dog can be made using simple methods. It will take no more than an hour to make. We offer two options for quickly making a dog with your own hands:
Option 1.
The toy is not filled with foam rubber or other fillers. This allows you to significantly reduce the time for its production. Firstly, filling requires careful work on narrow and small parts - tail, legs. Secondly, difficulties arise with suturing the hole for stuffing.
A simplified version without filling involves sewing crafts from several elements. It turns out flat, but quite cute. Such dogs are used to decorate gift wrapping and decorate the Christmas tree. The dog will make an excellent keychain, decoration for a bag or wallet.
Option 2.
The second way to make working on a felt toy easier is to use the simplest possible pattern. The fewer details a layout contains, the easier it is to work with. Products made from a complete pattern often look very original. It is enough to make one connecting seam, stuff the toy and the craft is ready.
The key aspects here are decorative elements and the choice of material. Fashionable dogs with small flowers and stripes, which often decorate coffee shops and are sold in brand stores, are also made from one single pattern.
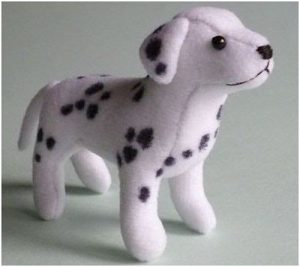
Beautiful felt dog - pattern, work diagram
To make a custom felt dog, you need to prepare the following set of tools:
- Paper.
- Needle and thread.
- Multi-colored sheets of felt.
- A simple pencil and a ballpoint pen.
- Scissors.
- Decor.
- Beads are black.
The dog is made according to a pattern downloaded from the Internet. You can also create a sketch yourself. Step-by-step sewing instructions:
- We transfer all the paper details onto the fabric, outline with a pen, and cut out.
- Sew the main part. Select threads of the desired shade.
- Using an overlock stitch, we attach the animal’s paw to the main part. They need to be sewn on one side, where there are no plans to make spots.
- We decorate the dog’s body with spots of various sizes.
- We fold the parts of the craft so that the dog’s legs are on the inside. There should be a gap in the stitching on the belly. With its help the legs will be attached.
- Sew the head. We start stitching the forehead from the nose area. On the other hand, we form the second part. The stitches run along the back of the head and nose. Leave a gap at the bottom of the product.
- We put the two elements of the ears together and sew them together.
- The main part of the dog is stuffed with cotton wool or other filler.Then we stuff the animal’s head and sew up the gap on the base.
- We connect the body to the head using a hidden seam.
- We sew ears on both sides of the head. To arrange the parts symmetrically, you can put marks in advance.
- Making the dog's face. Sew on beady eyes. They can be replaced with blue or blue rhinestones. We embroider the nose with black thread. We make the mouth from a red bead.
- We dress up the dog using a collar. We decorate it with a pendant according to the master’s taste - a heart, medal or small bone will look beautiful.
- The collar is made of red felt. We secure it to the neck with several stitches. Our dog is ready!
 0
0