creativecommons.org
Over time, furniture loses its appearance, but this is not a reason to throw away chairs and replace them with new ones. It is enough to study a master class on how to replace old upholstery and restore legs. You can turn time-worn products into fashionable interior items with your own hands. You don't need a workshop or a special set of tools for this. Every beginner can cope with the task. The range of fabrics and accessories allows you to choose the appropriate furniture design to suit your own taste.
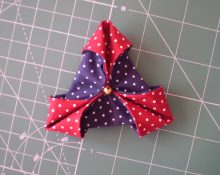
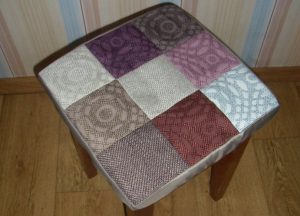
How to update a stool with your own hands - photo, how to cover a stool
There are many ways to upholster round stools with your own hands to give the furniture a second life. For new upholstery, you can choose any material - latex, leather or regular fabric. Restoring a chair is more difficult than a regular stool with a soft seat. Let's look at the most common and convenient way to cover a stool:
- Remove the stool seat.A flathead or Phillips screwdriver is suitable for this. You need to unscrew each screw that secures the seat to the stool frame.
- To remove the old upholstery, you need to carefully loosen the brackets. To do this, use a flat screwdriver to go under each fastener and move the tool in different directions, loosening the fasteners. The bend should allow you to remove the old fabric and foam.
- Remove the brackets using pliers. If the chair is old enough, the brackets may rust, and the fasteners often fall apart when pulled out. It is important to exercise maximum caution.
- Over time, foam rubber deteriorates, crumbles, and loses softness. Therefore, it is advisable to replace the filler during reupholstery. We cut out a shape from the material - a circle or square, corresponding to the shape and size of the seat. We use a glue gun to secure it to the surface of the chair.
- We cut out the material for the new upholstery. Lay the fabric out on a flat surface. We place a seat with a fixed filling on it. We trace the contours of the product with a pencil or chalk, taking into account five centimeter allowances. Allowances will be used for hems along the edges.
- The pattern on the material should be positioned evenly on the chair. To do this, reapply the fabric and check the location of the image. It is advisable to fix the upholstery in the correct position using pins.
- To fasten the material we use a stapler. The fabric must be stretched to avoid wrinkles or sagging. We fix paper clips every two centimeters.
- Cover the uneven edge of the material and staples with black fabric. We lay out a black cloth on a flat surface, and place the chair part with the bottom side on top. Cut out a piece of material along the edges of the seat. We do not leave allowances.The facing material should not extend beyond the boundaries of the seat.
- We use a stapler to secure the facing sheet to the bottom surface of the part. The staples should form a single line, with no gaps between the elements.
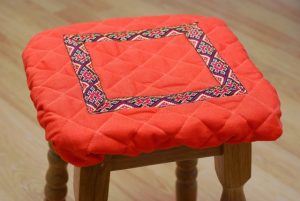
Restoring a stool with your own hands - photo of how to update a stool with your own hands
creativecommons.org
An easy way to update your stools is with a bold striped design. For this you will need:
- Grinding machine;
- Masking tape;
- Inker;
- Tassels;
- Acrylic paint of different colors;
- A little putty or primer.
Use sandpaper to clean the entire surface of the stool. There should be no old varnish, paint or other materials left on the furniture. To remove irregularities and dents, we use a grinding machine. Apply the primer to the stool, leaving no untouched areas, and leave the product to dry for a while.
Before updating the stool, you should choose the colors of the stripes. They should be in harmony with the rest of the interior and be combined with each other. Paint the stripes with the first color and leave to dry. Apply masking tape, make stripes of the next color, and leave to dry. We act on this principle until the desired pattern is obtained. Remove the tape when the paint layer is completely dry. Updating an old stool with your own hands is not at all difficult. The result is a fashionable striped chair decorated with your favorite colors.
How to update an old stool with your own hands using decoupage technique
A great way to update your stools with your own hands is to use the popular decoupage technique. It allows you not only to draw an original pattern, but also to create a real work of art on the seat of a chair.To work with the technique, special napkins with a variety of decoration options are used. How to update an old stool:
- Working with the surface. Before updating the stool, you need to completely remove the varnish and old paint from its surface. In the decoupage technique, it is extremely important that the area is perfectly smooth and clean. It is advisable to use a sander to remove uneven surfaces.
- It is better for novice craftsmen to choose a simple composition in order to gradually master the decoration method.
- You need to prepare a three-layer napkin with a pattern that will decorate the chair in the future. You will also need some varnish, PVA glue, acrylic paints, brushes and a piece of sandpaper.
- To clean the surface, it is better to use several types of sandpaper. They have different grain sizes.
- When the stool is completely clean, the seat should be wiped with damp wipes or a rag. Then the product is painted with acrylic paints. After the first layer has dried, the paint is reapplied. This is a mandatory step, since the napkin has a minimum thickness, so the drawings are almost transparent. A light background will emphasize the brightness of the picture.
- Using acrylic paints you can achieve a solid, solid background. The advantage is the absence of aroma and the speed of paint drying.
- When the acrylic dries, apply a patterned napkin. You can paste the entire layout or crop the picture along the contours. After removing the top layer, the napkin is applied to the surface of the chair.
- A solution is applied on top - PVA glue, diluted with water in a ratio of one to one. For application use a flat brush. You need to carefully smooth the napkin so that there are no folds, wrinkles or air bubbles.
- After the adhesive layer has completely dried, a protective transparent varnish is applied. It protects the drawing from mechanical damage. You can use glossy or matte varnish.
How to update stool legs - how to transform an old stool
An old chair is often revealed by its time-worn legs. The varnish and paint are peeling off, scratches and chips appear. In this case, even reupholstering the upper part will not help hide many years of service. Therefore, re-upholstery is not enough; the restoration process must be approached comprehensively. An effective option for updating an old stool is to use contrasting shades when painting the legs. Furniture with contrasting details is now at the peak of fashion. You can use both bright and pastel shades. Before updating an old stool, you need to prepare the following materials:
- A roll of masking tape.
- A brush.
- White acrylic paint.
- A stool or chair with wooden legs.
Initially, we process the furniture with sandpaper. The task is to completely clean the surface of the old coating. Afterwards a white primer is applied and the product is left to dry. Next you will need a strip of masking tape. We use it to divide the surface of the legs into two parts. We glue half of each support from the bottom to the middle. We paint the legs with the chosen color, for example, blue or yellow. Let the paint dry. Remove the masking tape. This is the easiest way to update an old stool with your own hands. If the top of the stool is wooden, paint it the same color as the legs.
 0
0