creativecommons.org
You can make a floor lamp with your own hands without leaving your home. There are many materials that are perfect for creating an exclusive lamp. Floor lamps are floor and table lamps that are used to illuminate office, residential or outdoor spaces. Features of floor lamps are a high stand and a lampshade that covers the light bulb. The material from which the lampshade is made restrains the rays of light, they become unobtrusive, pleasant, and do not hit the eyes. Due to its special characteristics, a floor lamp often becomes an indispensable element of a stylish, modern interior. A beautiful stand, an elegant lampshade and a non-standard design turn the lamp into a real work of art.
Fans of exclusive design prefer to make a floor lamp with a table with their own hands. Such things will definitely be unique, because there will be no analogues of a homemade lamp in the whole world. Before you make a floor lamp yourself, you need to familiarize yourself with the principles and basics of work.
How to make a floor lamp with your own hands at home - a fashionable homemade product from isolon.
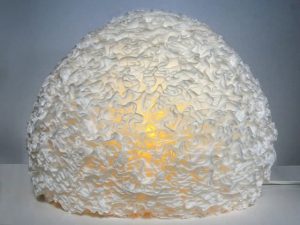
Making a floor lamp with your own hands from the new material isolon is an excellent solution for lovers of non-standard interior items. The raw material has excellent thermal insulation properties and is often used in renovation and interior design. The material has a foam structure, the cells are closed. Isolon insulates the lamp from humidity and cold and bends perfectly. With its help you can create real masterpieces. Today frameless models are in demand. To construct such a floor lamp with your own hands, you need to prepare:
- Acrylic, a plug, a switch and several meters of wire.
- A coupling that is sized to fit the chuck.
- A cartridge having a ring for fastening. The optimal size is E-14.
- A PVC or metal-plastic pipe with a length of three to four meters.
- Four meters of sheet isolon.
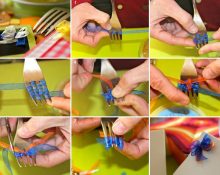
You will have to work with a hair dryer, scissors, a glue gun and a knife. Before you make a floor lamp, you need to prepare stencils on which the petals will be made. To do this, we draw details on paper and transfer the image to the material. You need to prepare eight elements measuring 150x150 millimeters, and twelve petals - 200x200 millimeters square. How to make a beautiful floor lamp with your own hands - sequence of actions:
- Removing the retaining ring from the chuck. It must be attached to the coupling.
- Preparation of twenty parts from the material in accordance with the pattern.
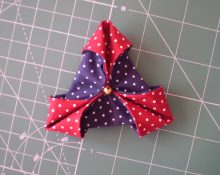
- Alternate fixation of leaves on the surface of the coupling. We begin the process of securing small elements, then move on to large parts.
- Softening of raw materials.To soften the isolon, use a hair dryer and a round thing to give relief. You can use a can, a lampshade or a ball.
- We twist the pipe into an intricate loop. This is the load-bearing base of the floor lamp. The wire must pass through the tube or coupling. The end is fixed at the point of connection with the cartridge.
- Glue the remaining decorative elements. To paint the product we use cans of multi-colored paint.
How to make a floor lamp with your own hands - making a floor lamp with your own hands
creativecommons.org
There is another way to make a floor lamp, which we will consider in detail. Step by step guide:
- We form a stepped block from two boards. The bottom bar is twice as thick as the top bar. The parts can be made from standard format boards with a thickness of 25 or 50 millimeters. If the stand is one and a half meters long, then the size of the lower element is 35x20 centimeters, and the top one is 30x15 centimeters.
- To treat the surface of a small element we use wood glue. We fix the board exactly in the middle, extremely close to the edge of the large element.
- We retreat five centimeters from the two-layer side of the base. You need to drill a hole with a drill, the diameter of which is three millimeters. We retreat a short distance and make a second, through hole. It will include a copper pipe, the slope of which is sixty degrees. You need to retreat twenty-five centimeters from the end of the pipe. A third hole is drilled near the joint. An electrical wire will pass through it.
- The next step is to check the conformity of the parts. If all the elements fit and form a reliable structure, install the beam on the base using wood glue. Let the product dry.
- To secure the wire passed through the pipe hole, we use a riser. At the end of the tube we strengthen the cartridge with the elbow. Work on the frame is completed.
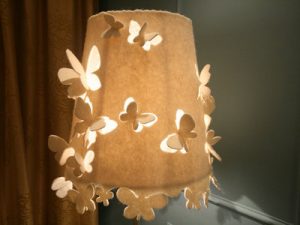
- You need to add a lampshade that suits the size and color. You can choose a suitable fabric in a specialized store, and design and make the model yourself.
There are many alternative solutions in the field of lamp manufacturing. To create stands and bases, hangers, tripods, pipes, slats, furniture panels, and plaster are used. The advantage of a hollow support is that the wire is completely hidden inside. In other cases, winding or other design tricks help hide the wire. Plastic springs allow you to change the height of the lamp. Remote control makes it possible to control the light from anywhere in the room.
Experts recommend using energy-saving light bulbs. They heat up less and are considered safe. The lamps can be used in paper, plastic and wooden lamps.
How to make a floor lamp with your own hands - master class on how to assemble a floor lamp on a tripod
Do-it-yourself tripod floor lamp is made from the following materials:
- Metal bases for lampshade.
- Lamp socket.
- Several magnetic parts from cartridges installed in laser printers.
- Wooden wheel. This is a decorative element, the diameter is no more than fifteen centimeters.
- Thin wooden cuttings on which shovels, hoes, and rakes are put on.
If all the necessary components are available, you can start working. The process consists of several stages:
- You will need a pipe that contains a magnetic shaft and a steel nut. The carving is made in accordance with the parameters of the lamp.
- The base for the light bulb is fixed.
- Wooden bases are processed. A hacksaw is used to cut the ends at an angle.The wooden wheel is secured with screws.
- The cut piece of the magnetic shaft is inserted into the middle of the wheel, and the wire is pulled through.
- A lampshade is placed on the wire. To do this, a bottom layer is made of several sheets of durable paper, and the material is stretched over it. The lampshade is installed on the base of the plinth.
 0
0