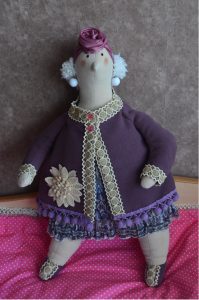
A rag doll is one of the oldest toys. Thanks to its versatility, it can serve as either a simple interior decoration, one of the characters in a home puppet theater, or your child’s favorite Scops Ops toy. In this article you will learn how to sew a rag doll with your own hands. At the end of the material you will find a step-by-step master class for beginners with a description of the technique in the photo. A pattern will also be presented at the end.
The history of the rag doll in Ancient Rus'
The rag doll appeared in our country a relatively long time ago, back in the days of Ancient Rus'. It is curious that rag dolls in those days performed not only an entertainment function, but also had a sacred character. A rag doll was a talisman; it was given to a baby on his birthday and placed with him in the cradle at night.
Only the wealthy could afford rag toys; the poor made do with products made from straw, clay and twigs. It was believed that dolls protected the child from the evil eye, damage and fatal illnesses.In some regions, a rag doll served as a pillow: it was filled with buckwheat.
Playing with dolls was encouraged, including because, by playing with them, the girl tried on the role of a housewife who takes care of the house and raises children.
The dolls were updated once a year: until the age of five, little girls were sewn with dolls by their mother, grandmother or aunt, but upon reaching the age of five, the girl was taught to use a thread and a needle. The first dolls of the young housewives were unsightly, but with each new doll, the craftswoman improved in her skills. By the way, ancient rag dolls most often did not have a face. It was believed that if you make a face on a doll, an evil spirit can move into it. Each family made its own doll in its own way, so the dolls of girls living in different houses were different from each other. And it wasn’t always about the family’s wealth. Moreover, dolls in Ancient Rus' were present at wedding and funeral ceremonies. Rag dolls were divided into play dolls, healing dolls, ritual dolls and protective dolls. Various outfits were sewn for the dolls and their favorites were dressed up depending on the time of year and holiday. The more outfits and hats the doll had, the more prosperous the family was.
What you need to sew a rag doll with your own hands
The choice of fabrics depends solely on the functionality of the doll. If the rag doll will serve as an interior decoration, then you can choose light fabrics. But if a rag doll is sewn for a child, then it makes sense to give preference to less easily soiled materials with denser textures so that the toy can be washed.
To make a rag doll you will need:
- Several pieces of fabric. Large sections can be taken for the doll’s body and her outfit, and smaller sections can be used for accessories and dress decor;
- Sewing supplies (threads, needles, scissors, chalk for transferring patterns);
- Filling made of cotton wool or holofiber;
- Decorative elements for decorating the doll's dress and face design: beads, lace, braid, beads, rhinestones, etc.
- For the face, you can use special fabric paints (optional).
Step-by-step master class on sewing a rag doll with your own hands
It’s better to sketch out a sketch in advance to understand what outfit the rag doll will have. You should not choose the first fabric you come across for sewing a product, as there is a risk that the product will turn out tacky and will not be pleasing to the eye. If you already have a piece of fabric to sew, make sure it matches other materials in color and texture. It is also worth thinking through all the decorations and their color compatibility in advance.
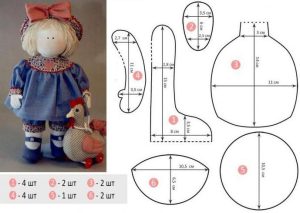
- Print and cut out the patterns for the product.
- Attach the pattern to the fabric and trace it with chalk. Duplicate the shape of the pattern and leave a margin of 05.-0.7 cm.
- Sew all the parts of the doll in pairs with the right sides facing inward. In this case, there should be a small section left in each part for the filler.
- Turn all parts of the doll right side out.
- Stuff each part of the rag doll with stuffing and sew up the remaining section as it is filled.
- Connect all the parts of the doll.
- Connect the patterns of the doll's dress with the fabric and repeat all the steps, remembering to leave a gap of at least 0.5 cm.
- Sew all parts of the dress and try them on the doll. If you do not plan to change the doll’s dress, then the cut of the rag doll’s dress can be modified directly on the product.
- Decorate the doll by painting its face with acrylic paints or hand embroidering it.
- Add decor to your dress to suit your taste.
 0
0