crafta.ua
A snail toy, the pattern of which consists of only two parts. It is very simple to do, and the result is an original and non-standard craft. To conduct a master class, you do not need any special skills or materials. Making a snail with your own hands is a great activity for children. Working with fabrics develops fine motor skills and the baby’s creative potential. It is interesting for a child to create a toy on his own. If the baby is still small, a mother or grandmother can make such a craft. All the necessary materials will probably be at hand at the hostess.
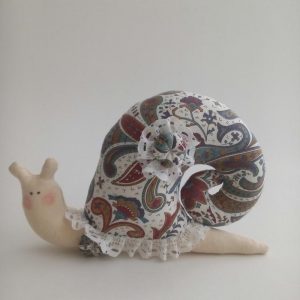
Do-it-yourself fabric snail - patterns, sewing
A DIY fabric snail toy is one of the options for creating a craft. It is advisable to choose natural material. Linen or cotton works well. You will need two types of fabric - one for the shell, the second for the body. For the body, it is better to choose a beige or brown color so that the toy looks natural. The shell can be made colored or plain - this is the choice of the master. You also need to prepare:
- Pattern.You can find a suitable option on the Internet, work with the dimensions - increase or decrease, print on a printer;
- Pins and scissors;
- Needle and thread;
- Filling material;
- Soap or pencil for outlining the outline;
- Glue gun;
- A stick for stuffing, can be replaced with a pencil;
- Braid, ribbon, beads, rhinestones and other decorative elements.
It is important to choose the right material. It should not crumble or crumble. A durable, soft fabric works best. All elements of the snail must be cut out and transferred to the material. First, iron the fabric well and fold it in half with the wrong side up. When cutting, allowance should be taken into account. Five millimeters is enough for allowances along the contours of the elements. To cut the parts evenly, it is better to use pins and carefully fasten the elements together. Also, working with grooved scissors will make the seams more secure. Then proceed according to the following instructions:
- Sew the elements along the edges by hand or with a machine stitch. Leave gaps for stuffing the toy.
- You turn a fabric snail onto your face with your own hands using a stick or brush.
- The bottom edge is folded over and basted. This will make the final stitch look neater.
- The fabric snail should be completely evenly stuffed with padding polyester. To do this, you can use a pencil or stick to push the filler into all corners.
- After completing the stuffing, sew the gaps together.
- We make a special mixture of coffee, tea and PVA glue. Pour some coffee into the tea leaves, add boiling water, and boil for five minutes. Strain and add PVA. Using a brush or sponge, the mixture is applied to the body of the toy. Then we put it in the electric oven for fifteen minutes. The temperature is one hundred degrees. The product will become more elastic, dry out, and acquire an original shade.
- Sew the body and shell using a blind stitch. It is more convenient to sew by pinning the shell to the body using pins. Blind seams can be hidden under braid or ribbon if they are not very successful.
- The resulting soft snail toy can be decorated to the master's taste. Embroidery, beads, and bright thread are used. You can make figures on the shell, use knitting or felting.
- A crochet hook is used to make the eyes. It can be replaced by sewing beads or seed beads.
The snail pattern is quite simple, so anyone can cope with the task. The product is ready, you can please your relatives or friends with a nice gift.
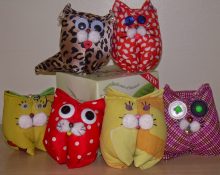
Felt snail master class “How to sew a snail from felt”
A felt snail is even easier to make than one made from fabric. The advantage of the material is that it does not unravel at the edges, so contour processing is practically not needed. The felt snail pattern is identical to the fabric model. It includes two parts - a body and a shell. The horns are cut out along with the body. A felt snail template can also be found on the Internet and printed in any size. In addition to the template you will need:
- Scissors, pins, chalk, pencil and chalk.
- Details for decoration are up to the taste of the master.
- PVA, thread, adhesive tape.
- Several colors of beads, satin ribbon, half a centimeter wide.
- Several round white buttons. It is important that they lack a leg.
- Dark colored beads.
- Two colors of felt.
The pattern of a soft snail toy is selected according to size and downloaded from the Internet. The dimensions are adjusted, then the layout is printed. In our example, the snail's house is made in the form of an elongated triangle. It will roll up into a roll. We transfer the details onto cardboard from office paper.We lay them out on felt, trace them along the contours with chalk and cut them out. The following is the sequence of actions:
- On the front part we select the location of the eyes. We sew on white buttons and place beads on top of them in the center. These will be eyes with pupils.
- Using beads we decorate the entire body of the toy. The decoration begins on the neck and ends on the tail. We do not touch the place where the shell is attached. We decorate the triangular shell itself in the same way.
- We connect the parts on the wrong side and pin them together. We make a seam along the outside. We use the loop type of stitch - we sew through the outline.
- Use a spray bottle to moisten the shell part, soak it, and twist it into a spiral. The size of the spiral corresponds to the size of the toy's body.
- Dry the shell. When the part is dry, apply it to the body and secure it with pins. We use a transverse seam for fastening. The stitches should be wide and equal.
- The stitching should divide the shell into several trapezoidal parts. From the inside, it divides the front and back sides of the toy. You can simplify the task and wrap the house with thread in a spiral.
- Sticky tape is sewn onto the snail's back and attached to the bottom of the shell. It must be stitched so that the elements are placed symmetrically.
- All that remains is to add rhinestones, other decorations or a loop to hang the toy.
Sewing a snail with your own hands is not at all difficult.
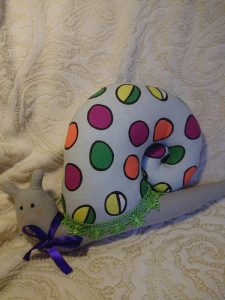
Snail pillow - pattern, sewing guide
shafa.ua
To sew a snail pillow, we will need:
- Thread, needle.
- Pattern or patterns.
- Pillow stuffing.
- Soft fabric.
We will make twelve blanks from fabric. First, let's transfer a pattern to the material, which you can make yourself. It consists of two crescents. One is slightly larger in size than the other fragment.We transfer them to the fabric using chalk or a pencil. There should be six pieces of each size. You can cut out parts from fabric. For variety, you can decorate the details with embroidery or drawings to make the pillow brighter.
Now we sew six blanks. We apply the wrong side of the two parts, go around in a circle with a needle or machine, leaving a small gap for stuffing. We turn all the fragments inside out and stuff them with padding polyester or other material.
We lay one crescent on top of the other and carefully sew them together. In a similar way we connect three large parts. We get a circle. We insert two smaller parts and sew them to the circle. One detail remains. It needs to be rolled up and placed in the middle of the pillow. Then secure with a seam. The snail pillow is ready.
 0
0