kidsstaff.com.ua
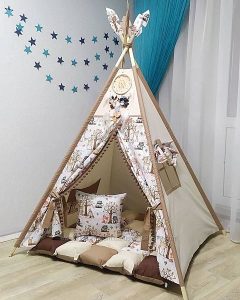
Many centuries ago, peoples who inhabited South and North America lived in wigwams. The design was also used by the Indians. Today, the wigwam is a specific symbol that reminds us of the distant past, when wild living conditions were natural for tribes. Today you can meet unique Indian huts only on TV screens, in plays or in children's rooms.
There is probably no child who would not at least once ask to make a children’s wigwam with their own hands or buy a tent. A purchased structure will cost parents a lot, so many begin to wonder: how to make a wigwam with your own hands for children? In fact, sewing a wigwam for a child is also not a cheap pleasure. But you really want to please the baby.
Children consider the hut their cozy place where they can retire, hide their favorite toys or whisper with friends.In the hut, the child is ready to fall asleep in a second, read a textbook and do all the things that are usually difficult to force him to do. If the baby is already old enough, he will be happy to help you sew a wigwam with your own hands. For him, this process will become an exciting game.
There are many ways to make a wigwam for children. A tent can have a different design, be oriented for use outdoors or at home, and so on. You can find a lot of instructions on the Internet. The first thing you need to do before sewing a wigwam for children with your own hands is to choose the right materials.
How to sew a wigwam for children with your own hands - a tour of the materials
The product is based on five components:
- Cushions on the carpet;
- Bars for the frame;
- Fabric for walls, for decoration;
- Oilcloths.
Experts who advise how to make a children's wigwam with your own hands correctly recommend starting work with the frame. The key parameter is the durability of the frame. You should choose wooden or polymer beams. They are as reliable as possible. A strong rope is used for upper fixation. Lower fixation is carried out using fasteners if there are no holes.
The fabric for the outer tent should be selected depending on the intended use of the tent. Before you sew a wigwam for children, you need to decide: it will be used in the country, at home, on trips to nature. It is not advisable to take thick fabric. Firstly, making a wigwam with your own hands will be more difficult. Secondly, it will be stuffy inside. Suitable:
- Teflon with cotton material.
- Oxford.
- Raincoat fabric.
- Taffeta.
Sew a wigwam with your own hands step by step - instructions for choosing a design
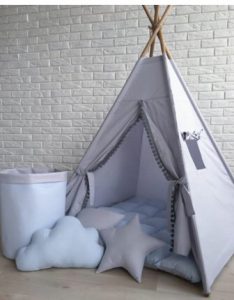
If parents do not know how to make a wigwam with their own hands, it is difficult for them to decide on the design of the future house. You can sew a wigwam with a different number of tops. Standard huts have one or two peaks; larger tents may have three or even four peaks. If there are two tops, then there will be two rectangular and two square fabric sides. One triangular side is the entrance to the house. The floor will be rectangular.
A hut with one peak provides for a round base. There may be eight or three sides, but other options are also possible.
In most huts, the entrance is covered with curtains. Velcro and ties are used for fixation. The approximate height of the entrance is the height of a five-year-old child. It is advisable to make a small window in the wigwam. The best option for how to sew a wigwam with your own hands for a baby from one to three years old is to make it completely transparent. This way parents will be able to monitor the baby.
How to make a children's wigwam - reliable design
kidsstaff.com.ua
Let's look at one example of how to sew a wigwam. This is not the only way, but it is quite optimal. Making a wigwam for children with your own hands - a step-by-step guide to preparing materials:
For the frame you will need:
- Wooden stick – 6 pieces. The thickness of the timber is not 2-4 centimeters. Length – two meters. Replacement is allowed with bamboo sticks. They are more expensive, but lighter, less flexible, and have an original appearance.
- A skein of strong rope, you can use twine.
- Standard roulette.
- Strong rubber bands or drill bits.
Prepare for the awning:
- Linen, cotton fabric - 1 piece of any material of your choice. Length – three meters, width – one and a half meters.
- Needles, threads.
- Strips of any material – 6 pieces. Length – thirty centimeters. Braid, cord, fabric, ribbon will do.
- Threads, needle.
These are the main components of the hut. The edges still need to be processed. Before sewing a children's wigwam, you need to choose a processing option. If you don't have a sewing machine, you'll need to buy self-adhesive tape and use an iron on the edge. In extreme cases, processing will have to be abandoned.
When making a wigwam with your own hands for children, you will have to pay special attention to the doors. Prepare in advance:
- Several eyelets – small diameter;
- Pencil;
- Lace or other accessories;
- Pins.
It will help you create an excellent wigwam with your own hands - a master class, tips on the forums, videos and much more. It is advisable to study information on how to make a wigwam before starting work. DIY wigwam for children - step-by-step instructions:
- We start with the frame. First option. We collect all the sticks and tie them with twine at a distance of 10 to 25 centimeters from the end of the beams. We arrange the bases in equal directions, maintaining equal intervals. We make one gap wider than the others. We check the reliability of the design. The second option is to assemble a wigwam. In all sticks we make through holes with a drill at the same distance from the end as in the first method. Fasten all the beams together without tightening the rope too much. Spread the sticks as far apart as possible until you get a cone. Wrap the top with twine.
- Make a wigwam with your own hands step by step, working sequentially with each detail. This will be the most reliable and efficient. The next stage is the awning. Lay out the material on a flat surface. Fold it in half, we get a square with edges of one and a half meters. The fold should be on the left side. Fold the fabric, connecting opposite corners. We get an equilateral triangle.
- To make a wigwam for a child with your own hands, you need to cut the fabric. Let's draw an arc.The starting point is the fold line, the ending point is any side. The origin of the arc is at a distance of five centimeters from the edge. The second arc is eight centimeters in diameter and goes to the tip of the figure. Cut and straighten the fabric. The shape of the awning should resemble a rainbow.
- We wrap the frame with fabric. The wrong side should be on the outside. We connect the parts using pins. We make marks in the places where the material comes into contact with all the sticks. The height of the mark is twenty centimeters from the bottom.
- We remove the material. Sew braid or ribbons from the inside along the marks. Each is thirty centimeters long.
- You can sew a wigwam for a child with your own hands using eyelets. You need to install them and simply tie the braid on the inside of the house.
- We stretch the awning over the frame, fasten the top, and close the door. To finish the wigwam with your own hands, you need to make a warm floor for your baby. Pillows, rugs, and blankets are suitable for this.
This completes the work on the hut. All that remains is to decorate the outside of the house, come up with original decorations, and you can invite your first guests!
 0
0