creativecommons.org
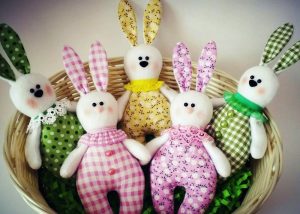
A handmade toy is a great gift for a child. It is guaranteed to be safe for health, cute and original. Felt bunnies are very soft, so even babies can play with them. A huge range of colors and accessories allows you to make an exclusive bunny of any color, size and model. Homemade toys look great on your keys as a keychain. Larger pieces can decorate a living room or bedroom. This cute felt bunny will be a great companion in the car. A small craft can be hooked on the windshield, and a large hare can be placed near the rear window. We’ll look at how to make a felt bunny with your own hands later in the article.
DIY felt bunny - patterns
First you need to make a bunny pattern. We choose the approximate size of the toy and draw it on paper in accordance with the proportions:
- Two circles - the front and back of the head;
- One small circle is the toy’s face;
- Small triangle - nose;
- Three droplet shapes are tops for carrots;
- Triangle with rounded corners - carrot;
- Two ovals with the top cut off in a semicircle - the front legs;
- Two smaller ovals with a semicircular top - hind legs;
- Flattened oval with a trimmed edge - ear pattern, four pieces;
- A circle slightly flattened on the sides with a semicircular trimmed top is the body.
Now you need to prepare the material. For work we will need:
- Four types of felt: pink, green, orange, white.
- Four types of threads to match the color of the material.
- Adhesive tape, scissors, needles.
- Details for the eyes - beads, buttons, special eyes for toys.
- A little padding polyester or padding polyester for filling.
Step-by-step instructions on how to make a soft toy from felt:
- We cut out all the details of the pattern and fix them on the material. It is advisable to use adhesive tape to secure the elements. Trace with a marker or pencil.
- Attach a smaller circle to the large circle. We use a buttonhole stitch. You need to sew a nose onto the muzzle.
- We sew two eyes above the face. If you have black felt, you can cut two small circles out of it and sew them on instead of buttons.
- We use a loop stitch separately to sew the ears in pairs. The parts can be lightly filled with synthetic padding.
- Let's move on to making the head. Sew the back circle to the part with the muzzle. While sewing, insert the ears one by one. The head should be filled as tightly as possible with padding polyester. Upon completion of sewing, fasten the thread.
- On the front part of the body you need to sew carrots and tops of several green elements. You need to make small stripes on the carrot using stitches.
- Sew the back part of the body to the front element. We fill the part with padding polyester and sew up the hole.We use only buttonhole stitch.
- A blind stitch is used to unite the body with the head.
How to make a felt bunny - felt bunny template
creativecommons.org
A do-it-yourself felt bunny, the diagram of which is presented below, is very simple to make. This toy will be a great friend for a newborn baby. It is soft and pleasant to the touch and does not contain hazardous elements. To make a cute felt bunny, you need to prepare:
- White paper;
- Pen, needle, filler;
- Sewing thread, scissors;
- Three colors of felt - yellow, purple, red.
The work process consists of several stages:
- Draw the silhouette of a bunny on white paper or light cardboard. When the bunny is ready, transfer the design to the fabric.
- On a piece of yellow felt we carefully draw all the lines of the silhouette. Using scissors you need to cut out the part in duplicate. This will be the back and front side of the soft hare. We choose any color - white, yellow, orange bunnies look cute.
- We draw circles on the material - this will be the face and belly of the hare. Let's make the inside of the ears red, just like the toy's nose. The color of the belly and muzzle can be identical to the product itself or differ by a couple of tones.
- Decorate the bunny with a bow between the ears. Let's choose a separate color for it.
- To the body, consisting of one element, you need to sew a belly, a face with a nose, and the inner parts of the ears. The stitch size should be kept to a minimum.
- Sew the front and back sides of the product. We stuff padding polyester inside. To fill the toy as efficiently as possible, use a pen, pencil or scissors, pushing the filler into hard-to-reach places. The bunny should not be stuffed too much.
- Eyes can be made from buttons and beads.Eyes drawn with a marker or nail polish also look interesting. Regular blush is suitable for making the bunny's cheeks red.
 1
1