creativecommons.org
Ancient Rus' was famous for its high-quality woven materials. In a family where girls grew up, it was customary to teach them weaving from early childhood. By the age of seven they became masters in this field. Today, traditional craft training has faded into the background. Birdo is rarely used. However, there are women who have carried their talent through the years and continue to work with the original technique. You can find courses that teach the skill, or learn the process yourself through workshops and videos. The ribbon or belt on the reed turns out to be surprisingly beautiful and non-standard. This ribbon will serve as an excellent decoration for a dress, trousers or suit. Berdo allows you to create a unique pattern on headbands, bag handles and other details.
Reed for weaving - we create beauty with our own hands
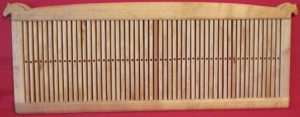
Woven fabric is created from threads.In this case, a special installation is used - a reed for hand weaving. Sometimes it is mistakenly called the hip. This is a lattice - thin plates of wood. They may have one or more holes through which the thread is threaded. All holes are located vertically. One thread goes into the hole, the other is threaded into the gap between the wooden plates. The reed rises and falls, gaps are formed between the main threads, and the remaining threads enter them.
Reed weaving is based on working with this tool, but other materials are also required. To create a belt or ribbon, you should prepare:
- Main thread. This bundle of yarn will thread the installation. It will form the basis of the products.
- Wool yarn of different colors. In this case, the threads must have the same tension thickness. Two shades are enough.
- Iglitsa. This is plywood with jagged edges on it. It is wrapped with threads to lay out the pattern.
- A clamp, several colored pencils, paper, scissors.
Before creating a belt, a diagram must be drawn up based on a pre-selected sketch. Then the reed is filled.
Weaving on a reed - step-by-step instructions, weaving belts on a reed
creativecommons.org
Weaving involves the use of three patterns to implement the filling pattern. It is created on the basis of transverse stripes, longitudinal and dotted lines. Ornaments can be combined to create a unique picture. To make a belt, you need to proceed in stages:
- We place the reed between the knees, lay out the main thread, focusing on the diagram, and thread it into the tool.
- From the skein we take out the required number of threads of the same color, in accordance with the diagram.We take them out from the side where the braided braid is located so that they do not get tangled in the skein in the future.
- We start filling the reed from the outer areas to the central zones. Alternately thread the threads into the hole and into the gaps. We stretch and fix. Then we move on to the next section. Having completed the work, align the threads and tie a loop. We thread a rope through it and fasten it to a hook.
- We wind the thread on the broom, using the main color. Use your finger to fix the end of the thread. We wrap it around the spout three times, bring the end under the main thread, and lower it to the bottom.
- We turn the broom and repeat the steps until the thread is placed on the spout.
- Comb the main thread and pull on a skein of yarn. At the same time, we place it in our left hand, and using the fingers of our right hand we comb the threads. We head from the instrument towards ourselves.
- We move the installation, repeat the process. We intercept the end of the skein and comb it again. All threads should be tensioned equally. We tie a loop, thread the rope and secure the end to ourselves.
 0
0