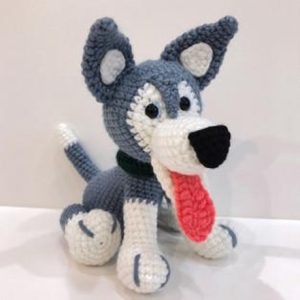
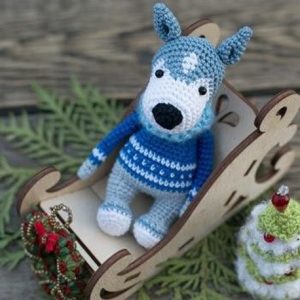
Husky dogs are adorable and loved by many, and if you have been knitting for some time, you can try crocheting your favorite pet. But first, you need to understand whether you can do this kind of work.
What you need to know to knit a husky toy
This job will require several well-mastered skills. It is important that you can crochet:
- Air loops;
- Decreases;
- Increases;
- Connecting posts;
- Single crochets;
- Half double crochets;
- Change color to white and gray.
If you can do all this, or at least have a great desire to learn, you can safely get to work!
What you will need
In order not to be distracted during the process, it is better to immediately prepare:
- Hook No. 1.75;
- Gray and white yarn;
- Filler for toys;
- Embroidery needle;
- Black sewing threads;
- 1 mm copper wire;
- Scissors;
- Fabric adhesive plaster;
- Super glue;
- Decorative eyes for a future toy;
- Velcro for clothes.
This set of items will be enough to create one toy.
The process of creating a toy
The toy will consist of several parts, which, as knitting progresses, will be connected to each other, gradually taking on the shape of a puppy. The sequence of steps is extremely important. Work begins with the tail and paws. It is also important to understand that for the correct result you will need to follow a certain color scheme - in the given algorithm it has already been built, but in order to fit accurately, you need to knit quite tightly.
We begin to knit a husky dog in parts.
Hind legs
One hind leg can be tied according to the following pattern:
Then all that remains is to prepare the second paw using the same principle and fill both parts with the prepared material.
Front legs
One front paw is made according to the following scheme:
Then you should take the prepared wire. Bend the piece in half to make it wider. The end of the product should be wrapped with a plaster - this way the wire will not pierce the yarn and will not slide inside. Loosely stuff the finished paw so that it can bend. Repeat the same with the second one.
Tail
It's time to make the tail. It is knitted according to the following pattern:
Once the overlays are ready, you can start knitting the body. It is better to do this in two approaches - tie the lower part of the body, sew ready-made parts to it, and then move on to the chest and neck.
Body
The body is the largest and most complex part of the dog; it is knitted like this:
All that remains is to stuff the body, and it will be ready; you can sew the already connected parts to it and continue working on the head and ears.
Head
First of all, let's make the husky's face:
The head is ready - you can attach it to the body and decorate it with eyes and antennae.
Ears
The last detail is the husky ears, they are knitted inside out:
The first ear is ready, now all steps need to be repeated to get the second one.Turn them inside out, stuff them a little with the prepared material and attach them to the entire structure. Great, you have a cute soft toy!
 0
0