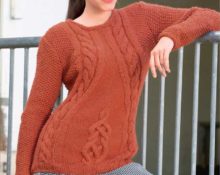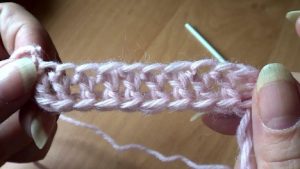
The ability to knit an elastic cast-on edge often comes in handy - without it you can’t make socks, a hat, or mittens. It also looks great as a neck for a sweater. Today we will look at how it can be connected.
Knitting principle
So, let's take a step-by-step look at working on an elastic cast-on edge:
- Pull a section of thread between the thumb and index finger of one hand.
- Pass the knitting needle under them and turn them over, catching a small loop.
- Pass the free edge of the knitting needle under two separate threads that have formed near the thumb.
- Insert the end of the knitting needle into the loop between the threads and grab the one that is further from the center of the palm.
- Grab the thread from your index finger with the knitting needle and pull it out from below; if everything is done correctly, there should be two small loops left on the knitting needle.
Then all that remains is to repeat the entire sequence of actions, casting more and more loops onto the knitting needle. The description may seem complicated at first, but it’s enough to try a few times for everything to become easy.And after you manage to fill your hand, such a super-elastic inlaid edge will be created as quickly as possible.
How to make the edge even more elastic
The inlaid edge itself, created in this way, stretches very well, but if there is a need to obtain even greater elasticity, this can also be achieved. The secret is simple - instead of one knitting needle, you need to use two. Press them tightly together and repeat the same algorithm of actions as if you were using one knitting needle.
How to make an elastic crochet cast-on edge
In addition to the option with knitting needles, a crochet hook can also help make an elastic cast-on edge. Moreover, with the help of this tool you can create three knitting options at once, which will differ in the level of elasticity and appearance. The fundamental difference in the work is in what elements the knitting is made from.
From connecting posts
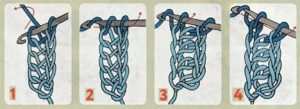
This type of cast-on edge is knitted like this:
- Make 2 air loops.
- Insert the hook into the first of the loops.
- Hook the working thread and pull 1 loop out.
- Pick up the working thread again and knit the 2 loops that remain on the hook.
- Pass the hook through the outer left thread of the loop.
- Repeat steps 3 to 5 as many times as necessary to cast on enough stitches.
An inlaid edge made in this way turns out smooth, symmetrical and beautiful.
From single crochets
If the previous cast-on edge did not seem elastic enough to you, you can try replacing it with another option:
- Cast on 2 chain stitches.
- Insert the hook into the first of the loops.
- Pick up the working thread and pull one loop out.
- Hook the working yarn again, but this time only knit one of the loops on the hook.
- Pick up the working yarn and knit 2 of the remaining loops on the hook.
- Insert the hook behind the outer left thread of the loop.
- Repeat steps 3-6 until you have the required number of stitches.
In this case, the knitting will look more relaxed, but the stretch will also be stronger.
From half double crochets
This option looks very similar to the previous one. However, its elasticity is even higher. To connect it, you need to do this:
- Cast on 3 chain stitches.
- Make 1 yarn over.
- Insert the hook into the first of the chain stitches.
- Hook the working yarn and pull 1 loop through.
- Pick up the working thread again and knit another of the loops that are already on the hook.
- Hook the working yarn again, but this time knit 3 more loops from the hook.
- Make 1 yarn over.
- Insert the hook behind the outer left thread of the loop.
- Repeat steps 4-8 until you reach the desired number of stitches.
This option stretches better than all the others, but does not suit all things, so you still have to choose based on your goals. Whichever option you choose, you'll end up with a great cast-on hem that's stretchy enough to use in clothing.


 0
0
