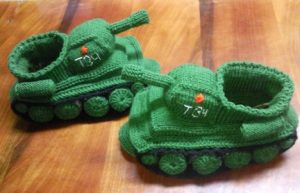
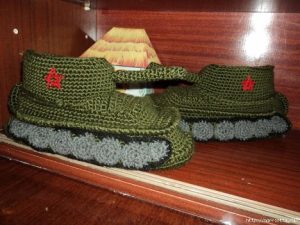
Crocheting tank slippers is a great way to use your knitting skills and create an original accessory for your home. In this article we will look at how to crochet Tanki slippers for beginners, and also provide diagrams and a description of the process.
Slippers Tanks crochet: master class
- Selection of material and tools: to knit tank-shaped slippers you will need yarn (preferably synthetic or mixed for better wear resistance), a hook of a suitable size and scissors.
- Determining the size: before you start knitting tank slippers, determine the size of the feet for which the slippers are intended. Based on this, select the number of loops to start knitting.
How to knit Tanki slippers: main steps
- Knit the warp: Start by knitting the base of the slipper. First, create an amigurumi ring and tie a certain number of loops around it. Then continue knitting in the round, increasing the number of stitches until you reach the desired size.
- Create the top of the sneaker: After completing the base, move on to the top of the sneaker. Single crochet, following the shape of the warp and creating the effect of tank armor.
- Knit Tank Tracks: Tank tracks are a distinctive feature of Tanka slippers. Knit two strips of single crochets, the length corresponding to the length of the slipper. Then sew them to the base, creating the appearance of caterpillars.
- Add details: To finish working on the Tanki slippers with knitting patterns, you can add additional details, such as a tank gun or a logo. This will give the slippers even more originality.
Scheme
Here is a detailed diagram and description of the process of crocheting Tanki slippers:
Materials and tools:
- Yarn (acrylic, blended or cotton) in two colors: main color and contrasting color for details.
- A hook of a suitable size (depending on the chosen yarn).
- Scissors.
- A needle for sewing or securing threads.
- Soft fabric and insoles (optional).
Slipper base (bottom):
- Start by creating an amigurumi ring, crochet 6 single crochets inside the ring and secure the last stitch with a broach into the first stitch.
- In the second row, knit 2 single crochets into each stitch of the previous row (12 stitches in total).
- In the third row, work alternating increases: 1 single crochet in the first stitch, then 2 single crochets in the next, and so on. As a result, you should have 18 columns.
- Continue increasing the number of stitches in each row, following the chosen increasing pattern, until the base of the product reaches the desired size.
Upper part of the sneakers:
- After completing the base, start on the top. Single crochet along one side of the base, leaving room for the heel and toe of the slipper.Knit the required number of rows to obtain the desired height for the top of the slipper.
- Switch to a contrasting yarn color and work a few more rows of single crochets to create a tank armor effect.
Tank tracks:
- Knit two strips of single crochets in a contrasting color, with a length corresponding to the length of the slipper. You can choose the width of the tracks at your discretion.
- Sew the strips to the sides of the base of the sneaker, following the shape of the base and placing them along the length of the sneaker to create the appearance of tracks.
Tank cannon and other parts
Experienced knitters can continue their masterpiece:
- Single crochet the cylinder using a contrasting yarn color to create a tank gun. Select the length and diameter of the gun according to your preferences.
- Sew the cannon to the top of the sneaker, on the front of the “armor”.
- If desired, add other details such as a logo or embellishment to the top of the sneaker.
Adding lining and insole (optional):
- Cut two pieces from soft fabric that match the shape of the base of the slipper.
- Sew the lining to the inside of the base of the sneaker, carefully finishing the edges.
- Cut out the insoles from a material that provides extra comfort and insert them into the slippers.
Now your crochet Tanki slippers are ready! You can experiment with designs, colors and materials to create your own unique style of Tanki slippers.
Crochet Tanki Slippers: a master class for improving skills
- If you already have some crocheting experience, you can use different patterns to create a more complex and interesting Tanki slipper design.
- To create unique Tanki slippers, try using different colors of yarn.You can choose classic military shades or, conversely, make your slippers bright and creative.
- To make your crochet Tanki slippers even more comfortable, you can add a soft fabric lining and insoles. This will also help increase the durability of your sneakers.
- Using different materials: Depending on the preference and purpose of the slippers, you can use different types of yarn, such as cotton, acrylic or wool. This will allow you to create slippers suitable for different seasons and conditions.
Conclusion
Crocheting Tanks slippers is a great way to make a unique and practical accessory for your home. By following the proposed diagrams and descriptions, even novice craftsmen will be able to cope with this task. Also, don't be afraid to experiment with designs, patterns and materials to create your own unique style of Tanki slippers.
 0
0