Hand-knitted dolls are attracting more and more attention. But to make such a doll, it is not enough just to know how to knit - it is also important to prepare the correct frame. Today we will figure out how to do this.
What materials can be used
There is no universal option for wire for a frame, so when choosing, you should start from your capabilities and preferences. There are several options:
- Copper wire, 1 mm thick. Such material will be quite durable, but you will have to make an effort to change the position of the doll.
- Aluminum wire. It bends well, even a child can change its position, but with constant use it breaks quite quickly.
- Steel wire. It turns out to be even more stable and durable, but may seem too rigid. Additionally, steel will rust over time and the rust will become noticeable on the doll.
If you want to use steel, but are afraid of rust, you can wrap the wire, for example, with electrical tape. If the material is different, then only the ends of the structures will have to be wrapped so that they do not pierce the knitting. You can use not only electrical tape for this, but also a fabric adhesive plaster.
How to make a frame
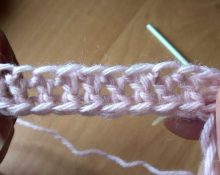
Some craftsmen prefer to knit directly around the frame, but for beginners this method is considered less convenient. Therefore, it is better to first tie the doll’s legs and body to the waist, and then start working with the selected wire. This is done like this:
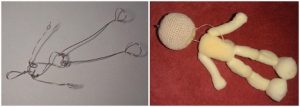
- Cut two pieces of wire so that each is approximately 2 times longer than the already obtained part of the doll - from these you will create a frame for the legs and body.
- Cut a piece of wire that will become the frame for the arms.
- Fold one side of each leg piece over to create a foot support.
- Insert one of the blanks into the knitted part of the doll and bend it in half to outline the hip joint.
- Pull out the workpiece and, following its example, bend the second one in the same way.
- On both workpieces, step back a little from the bend and bend the wire upward again.
- Connect the blanks and twist the wires together. The legs should remain down.
- Insert the resulting frame into the knitted workpiece.
- Bend your feet so that the doll can stand.
All that remains is to add the toy filler to the lower part and the legs will be ready. It is better to start working on the arm frame only after the arms and upper body are tied. After that:
- Take the wire prepared for the hands. It should be slightly longer than the arm span.
- Unwind the twisted wires to the place where the doll's shoulders are.
- Insert the prepared wire between the two already installed ones.
- Insert the wire into one of the doll's hands and pull it out from the other side through the amigurumi ring. To do this, initially when knitting it should not be tightened too tightly - it is better to leave a loose thread and tighten it after the work with the frame is completed.
- Do the same with the second hand.
- Twist the main doll frame again to secure the wire in place.
- Bend one end of the wire so that it is not sharp. Push the wire to the other side so that it is completely hidden under the knitting and tighten the amigurumi ring. It is better to flash it additionally during subsequent processing.
- Cut off any excess wire on the other side, if there is any. The wire should stick out from your hand by about half a centimeter.
- Fold the sharp edge over and hide it under the knitting.
The frame is ready! All that remains to put on the doll is the knitted head - for this there is some space of wire left on top. Such a doll turns out to be mobile and stable.
 0
0