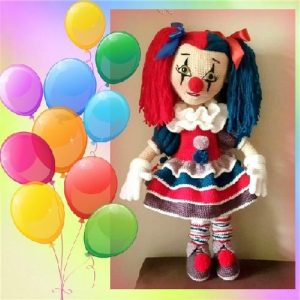
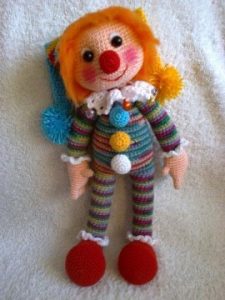
A clown is a great option for a toy that you can knit with your own hands. In this article you will receive a diagram and description of a crocheted clown, which you can make yourself using a hook and soft yarn.
Selection of materials
Before you start, it is important to choose the right yarn and hook. It is best to use soft yarn to ensure that your clown is pleasant to the touch. The size of the hook depends on the thickness of the yarn and the knitter's preference.
The article further mentions a magic ring. This is a way to start knitting a circular piece without a hole in the center, which is usually used when knitting amigurumi.
To create the magic ring that will be used in this craft, you need to tie the end of the thread into a loop, then wind the thread around twice and draw the first row inside the ring, tightening it after you start knitting. This allows you to create a compact and beautiful start to the circular work.
Materials:
- Yarn (any suitable for crocheting);
- Embroidery threads (different colors for embroidering the face and other details);
- Filling (synthetic fluff or holofiber);
- Buttons or beads (for eyes);
- Threads of yarn of a different color (for hair).
Tools:
- Hook (size depends on yarn).
- Scissors.
- Knitting needles (for sewing on parts).
- Needle (for embroidering the face and other details).
- Marker or thread of a different color (for marking rows).
Please note that specific materials and tools may vary depending on your choice of yarn and other details.
Beginning of work
Start with a crocheted clown head. Tie a magic ring and knit 6 single crochets (SC) in it. Then knit two sc in each of the 6 stitches of the previous row.
Body Shaping
Next, move on to shaping the body. Start by working one sc into the first stitch of the previous row, and then work two sc into the next stitch. Repeat this pattern alternating 1, 2, 1 and 2 sc until the end of the row.
Creating arms and legs
Once you have formed the clown's body, move on to creating the arms and legs. To do this, knit 6 sc stitches, then knit two sc stitches in the next stitch and repeat this pattern until the end of the row. Repeat this process two more times to get 3 rows of sc.
Creating a Face
Next, move on to creating the clown's face. For the eyes, knit a magic ring and knit 6 sc in it. To form the nose, knit a magic ring and work 8 sc in it. For the mouth, knit 10 chain stitches (CH) and knit 10 SC in them.
Assembling the toy
After you have connected all the parts of the clown, proceed to assembling it. To do this, sew all the parts together, starting from the head and ending with the legs.
Shutdown
Once you have assembled the clown, you can add additional details such as hair, a hat or a bow. For hair, you can use threads of yarn of a different color and sew them to the clown's head. A hat or bow can be knitted separately and sewn to the toy’s head.
A crocheted clown can be a great gift for a child or friend who loves unusual crafts. In addition, a clown can be used as a decorative element in a children's room or at a children's party. Also, a knitted clown can be part of a collection of knitted toys or used to create scenes in the theater. In general, the use of a knitted clown is limited only by your imagination.
Now your knitted clown is ready to play or will be a great gift for a child or friends. Remember that knitting is a creative process and you can use your imagination and experiment with different colors and shapes. Follow our diagrams and descriptions and you will be able to knit your own colorful clown.
 0
0