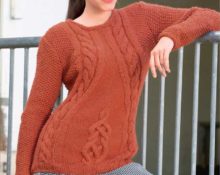
Sweatshirts are a comfortable and very practical item made from different types of thick yarn for the cold season. And if you choose a thinner yarn, you can make a product that can be safely used in the off-season! For example, from mohair or fine wool.
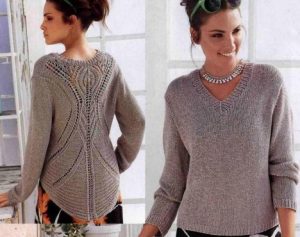
Sweatshirts with an elongated back occupy a special place in women's fashion. These products differ from the classic and familiar model by their rather long back panel. This allows you to add comfort and coziness when wearing and avoid the eternal problem when the back constantly lifts up when bending over or sitting. That is, we can conclude that such a model not only provides comfort and warmth, but also preserves fragile women’s health during active recreation in nature during the cold season.
Preparing materials for work
So, what is needed to knit a sweater of this model:
- Yarn (70%/80% sheep wool, 30%/20% polyamide) – 760 grams;
- Straight knitting needles No. 5 or 5.5;
- Circular knitting needles No. 5 or 5.5;
- Scissors;
- Needle with blunt end for assembly;
- Threads, decorative elements (optional).
Basic knitting pattern
Rows in forward and reverse directions: 1st row – 1 edge * 1 purl, carry the thread behind the process, remove 1 front one. When knitting purl, pass the thread before the process. Finish with purl and edge loops.
Row 2: Knit all knit stitches. Repeat rows 1 and 2 according to the product pattern.
Garter stitch: All knit stitches on both sides of the knitted fabric.


Progress
Back. Place 73 (85) stitches on straight needles and make two rows with knit stitches. Next, make 6 rows in garter stitch. After 15 (17) centimeters from the “start of the product”, make another 7 rows of garter stitch. Next, knit with the main pattern, making sure that the smooth side of the pattern is on the front side of the product.
After 43 (45) centimeters from the beginning of knitting, close the loops on both sides. And then, every 4 rows, decrease by another 2 (4) centimeters to form and design the armhole.
After 63 (65) centimeters, close 22 loops in the middle to form a neckline. In the future, both sides need to be completed separately. For a smooth rounding, it is necessary to close 2 (3) loops in each 2nd row.
Please note: the front should be 7-9 centimeters shorter than the back.
Cast on 73 (85) stitches on straight needles and knit 6 rows in garter stitch. Next, knit with the main pattern, but so that the textured side is on the front part of the product. After 7 (9) centimeters from the beginning, knit 7 rows in garter stitch. Next, knit again with the main pattern, but it is necessary to take into account that the smooth side of the pattern is on the outside of the product. After 35 (37) centimeters, begin decreasing to form the neckline, 2 loops on each side.After 47 (49) centimeters, close the central 17 loops, finishing both sides separately. To form a smooth neckline, you need to close 2 more loops on each side in every second row.
Sleeves. Using straight or circular knitting needles (optional), cast on 40 (42) stitches and knit alternately with garter stitch and the main pattern. The alternation can be either on the front of the product or at your own request. Without increasing, knit 25 rows. Next, add one loop on each side. Continue knitting until you get 44 (46) centimeters from the beginning of knitting. Next, decrease every 4 rows by 2 stitches. After 59 (61) centimeters, close all the loops.
Assembly
First, slightly moisten the parts and stretch them according to the finished patterns. Allow to dry completely naturally. Next, start assembling the product: first sew the shoulder seams, and then sew in the sleeves. If the sleeves were made on straight knitting needles, then before sewing them into the armhole, they must be sewn into a kind of “pipe”, and only then inserted into the armhole.
The finished product can be decorated with embroidery, beads, applique, ribbons and so on.
 0
0