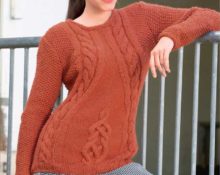
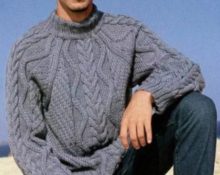
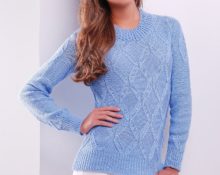
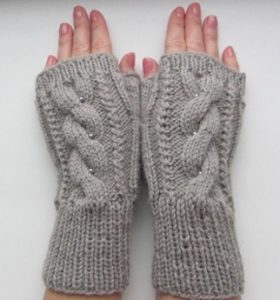
Mitts - These are gloves with a slot for the fingers. Mittens are especially useful in cold weather: they will help keep your hands warm, but at the same time you can move your fingers freely. This product can be easily knitted using yarn and knitting needles - even a beginner can cope with this task. Mitts with a “braid” pattern will look especially beautiful.
Preparing for knitting
To tie mitts with a braid, you will need the following set of tools:
- Knitting needles – 5 pieces (preferably thin, 2-3 mm in diameter);
- Yarn (for such a product it is better to choose thicker yarn, then the mitts will be very soft and warm);
- Crochet hook (it will not play too big a role in knitting, so you can take any one);
- A medium or large pin (3-5 cm in length).
Knitting process
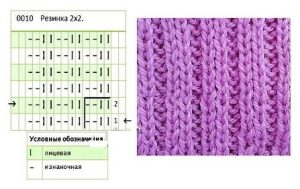
The first step is to cast on 12 stitches on each of the four needles. There will be 48 loops in total. The next step is to knit a 2 by 2 elastic band (the diagram is shown below).The length of the elastic is usually made in 15-17 rows, but it can be changed depending on your preferences.
Then the main stage of knitting begins. It consists of two steps.
- Step 1. You need to knit several purl and knit stitches in the following order: six knit stitches, three purl stitches, then six knit stitches and three purl stitches again. The rest of the row must be knitted with facial loops. Using the same pattern, you need to knit 5 more rows.
- Step 2. Now you can finally start knitting the pattern so that the mitts turn out “with a braid.” Again we knit the front and back loops according to the following pattern: six front, three purl. The next three loops need to be lowered and three more knit stitches need to be knitted. The dropped stitches must be transferred to the nearest knitting needle. We knit the rest of the row with facial loops. The loops had to change places, forming the necessary pattern.
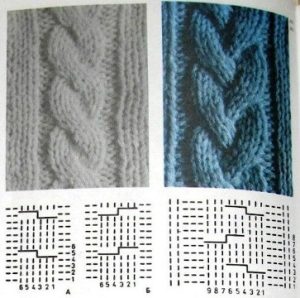
Next, we repeat the first step, knitting another 6 rows according to the pattern, and then the second step.
It is worth noting that the product must be constantly tried on until the length is suitable. After this you will need to prepare a hole for the thumb.
First you need to transfer the required number of thumb loops to the pin (usually 7-9). And on the knitting needle you need to cast on the number of air loops that were transferred to the pin. Next, knitting occurs according to the already known pattern (steps 1 and 2). We finish knitting with the elastic band that started knitting. Usually it is made 8-9 rows long.
Once the knitting of the main part of the mitt is completed, you can proceed to knitting the thumb. Here we need a hook: with its help you need to pull 10 loops from the top of the mitt.There are 18 loops in total - 8 on the pin and 10 on the hook. You need to evenly distribute these loops on three knitting needles - six on each. Next, you need to knit according to the usual pattern to the desired length. This completes the knitting of mitts with a braid.
How to decorate mitts with a braid?
To make a yarn product look even more beautiful, you can make additional decorations for it.
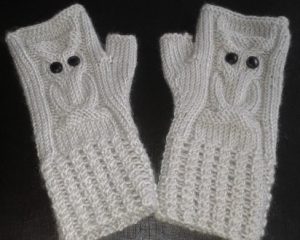
For example, you can make mittens from owl patterns. Below is a detailed knitting pattern for such a product. You can sew buttons or large beads to the mitt as eyes.
Bows are also an excellent decoration for mitts - this option is very suitable for children.

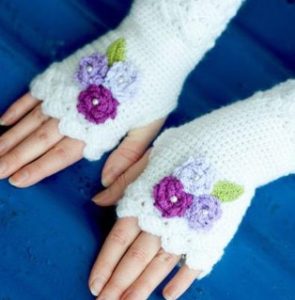
You can decorate a knitted product with this pattern in the form of flowers.
As a decoration for the mitts, you can also make some interesting pattern, as in the photo below.
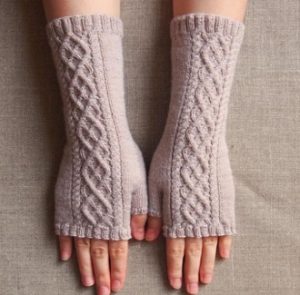
Mittens can be decorated with beads, both large and small. They can be gradually woven into the knitting process, or sewn onto the finished product.
 0
0