Knitted pillows look very original. They create a special atmosphere around them. It is especially important that in this way you can give a second life to old, lying around pillows. They obviously will not attract attention, and perhaps even ruin the entire impression of the interior. However, in the new version they will complement it perfectly.
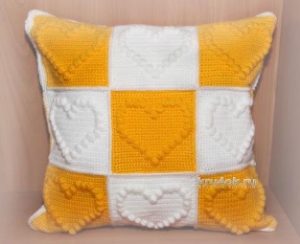
White and orange motif pillow
Necessary materials:
- Yarn “Children's novelty” from Pekhorka;
- Hook No. 2.
Progress
This pillow can be knitted from leftover yarn. The color scheme may not be limited to just two colors. The pillow will require 18 motifs. In this version, 9 white and orange were used. The dimensions of the finished product are 34*34 cm.
All motifs are knitted the same way. To begin, dial 27 VP.
Row 1 and all other odd rows – lifting loop, 27 sc.
2 r. – lifting loop, 27 SBN.
4 rub. – lifting loop, 13 sc, knot of 5 sc, 13 sc.
6 rub. – lifting loop, 11 sc, knot of 5 sc, 3 sc, knot of 5 sc, 11 sc.
8 rub.– lifting loop, 9 sc, knot of 5 sc, 7 sc, knot of 5 sc, 9 sc.
10 rub. – lifting loop, 7 sc, knot of 5 sc, 11 sc, knot of 5 sc, 7 sc.
12 rub. – lifting loop, 5 sc, knot of 5 sc, 15 sc, knot of 5 sc, 5 sc.
14 rub. – lifting loop, 3 sc, knot of 5 sc, 17 sc, knot of 5 sc.
16 rub. – lifting loop, 2 sc, knot of 5 sc, 21 sc, knot of 5 sc, 2 sc.
18 rub. – lifting loop, 2 sc, knot of 5 sc, 21 sc, knot of 5 sc, 2 sc.
20 rub. – lifting loop, 2 sc, knot of 5 sc, 10 sc, knot of 5 sc, 10 sc, knot of 5 sc, 2 sc.
22 rub. – lifting loop, 3 sc, knot of 5 sc, 7 sc, knot of 5 sc, 3 sc, knot of 5 sc, 7 sc, knot of 5 sc, 3 sc.
24 rub. – lifting loop, 5 sc, knot of 5 sc, 1 sc, knot of 5 sc, 1 sc, knot of 5 sc, 7 sc, knot of 5 sc, 1 sc, knot of 5 sc, 1 sc, knot of 5 RLS, 5 RLS.
25–27 r. – lifting loop, 27 SBN.
If desired, the motifs for the back can be modified by making the pattern on them flat rather than convex. The sequence of their implementation is described below and presented in the diagram.
Cast on a chain of 6 VPs and close in a circle.
1 rub. – 3 lifting loops, 4 SSN, 3 VP, * 5 SSN, 3 VP *. Alternate from * to * until the row is completed.
2 r. – 3 lifting loops, 6 SSN, 3 VP, * 9 SSN, 3 VP*. Alternate from * to * until the end of the row.
3 r. – 3 lifting loops, 8 dc, 3 ch, *13 dc, 3 ch*. Change from * to * until the end of the row.
4 rub. – 3 lifting loops, 10 SSN, 3 VP, *17 SSN, 3 VP*. Alternate from * to * until the row stops.
5 rub. – 3 lifting loops, 12 SSN, 3 VP, *21 SSN, 3 VP*. Change from * to * until the end of the row.
6 rub. – 3 lifting loops, 14 SSN, 3 VP, *25 SSN, 3 VP*. Alternate from * to * until the end of the row.

To ensure that the volumetric and flat pattern motifs are the same size, you should complete the knitting on the sixth row.
Assembly
Each of the prepared 18 motifs must be tied with 1 row of sc.
To properly combine the motifs into a ready-made pillow, they must first be laid out in a checkerboard pattern. You can connect them either simply by stitching with a needle and thread, or by crocheting. In the second option, the seam will be raised. To do this, all the motives are simply connected to each other using RLS. In this case, they need to be folded with the wrong side inward. You should start tying from the initial loop of the edge, skipping only the corner one. When the two motifs are connected, make a VP and then knit in the same way.
The part of the pillow where the motifs will be without voluminous hearts is best joined with a flat seam. To do this, the wrong side of the motif must be turned outward. They also need to be tied with sc.
At the end of the work, sew in a zipper and tie the remaining sides 1 next to the sc. Turn the pillow cover right side out and place it on the pillow. If there is no pillow of a suitable size, then you can simply add filler inside the cover. The pillow is ready!
 0
0