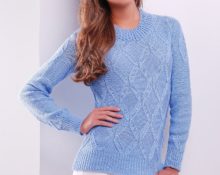
A pullover is a type of traditional sweater that is very popular among girls of all ages. Every modern woman has such a product in her wardrobe. Wraparound models are especially in demand. The reason is that they are universal and are perfect for any figure, as they hide minor defects in the silhouette. You can wear a wrap pullover to a business meeting, a walk, or even a date. Of course, there are many models of products in stores, but lovers of something original and extraordinary can try knitting a pullover with their own hands.
Necessary materials
To create a wrap pullover you will need:
- yarn – 250 g (mohair + polyacrylic);
- finishing yarn – 80 g;
- knitting needles - No. 3.5.
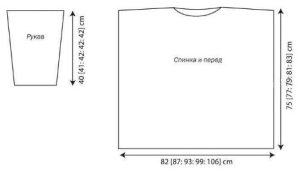
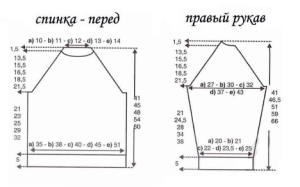
Creating the back and front
The procedure is as follows:
- Cast on 83 stitches using the cord method.
- Work the first row with purl loops, and then complete the pattern using the diagram: knit the edge loop 1 time from the 3rd to the 12th loop, repeat 5 times from the 1st to 12th loop, and then 1 time from the 1st loop on the 11th loop.
- Count out 22 cm and add 1 loop on both sides in every 8th row 5 times. There should be 93 loops in total.
- Knit the added loops using the facial method.
- From the beginning, measure 42 cm and close the armholes on both sides with 5 loops. Then in every 2nd row 2 times 2 loops and 1 time 1 loop. This makes 73 loops.
- Measure 66 cm from the beginning on both sides to make a shoulder bevel and cast off in every 2nd row 2 times with 7 loops and 1 time with 8 loops.
- To create a neckline, you need to close the central 19 loops and then knit both sides separately.
- To complete the rounding, you need to make 3 loops once and 2 loops once on the inside in every 2nd row.
The front part of the pullover is knitted in the same way as the back. Only after counting out 22 cm of loops, you need to divide them. On the right side, remove 19 loops onto a separate needle, and draw the remaining 64 loops into the right shelf.
Right and left shelves
On the left side there is an extension and an armhole, similar to the back. On the right side, make a bevel to the neck and bind off 1 loop alternately in every 4th and 2nd row 37 times. Having retreated 66 cm from the beginning to bevel the shoulder, you need to close 7 loops on the left side in each 2nd row 2 times, and also 1 time 8 loops.
When creating the left front, you need to count 19 loops and remove them to another knitting needle and cast on 45 loops from the wrong side of the right front. Knitting is carried out symmetrically to the right shelf.
Sleeve
The procedure is as follows:
- Cast on 35 loops in a corded manner.
- Knit 10 rows using the garter method.
- Next comes the knitting of the pattern, which is done in a similar way to the back (step 2).
- Measure 12 cm from the beginning of the sleeve bevels and add 1 loop on both sides in every 8th row. Do it 2 times. Then 1 loop in every 6th row - 10 times. There should be 59 loops in total.
- Insert the added loops into the pattern.
- Having retreated to a height of 46 cm from the beginning, close 5 loops on both sides for rolling back. Then in each 2nd row add 2 loops 2 times, in each 4th yard 1 loop - 7 times, in the 2nd row - 2 loops 2 times and 1 time 3 loops.
- Having retreated 58 cm from the beginning, it remains to close the remaining 13 loops.
- The second sleeve is knitted in the same way.
How to assemble the product
The build process looks like this:
- Pin the resulting elements onto the pattern, sprinkle with water and wait until dry.
- Sew seams on the sides and in the shoulder area. Make the seams of the sleeves in the same way.
- You can decorate the edges of the sleeves and the bottom of the pullover by tying the stripes with decorative thread. To do this, cast on 10 loops and knit them with stockinette stitch. You should get 2 elements, the length of one is 20 cm, the other is 104 cm.
- Sew the long side of the strip along the edge of the sleeves and bottom, and the short side to each other.
- Again, knit a strip with stockinette stitch, the length of which is 160 cm. Fasten one side along the edge of the left shelf, and the other along the edge of the right.
There are many models of wrap pullovers, but this option is one of the classic ones. In addition, this knitting pattern is suitable even for beginners.
 0
0