A shawl collar is an elegant and practical option for decorating a collar. It is used both on swing products with a button or zipper fastener, and on models with a solid knitted front. There are many variations of the “shawl”, but regardless of the features of the style, there are only two ways to make such a collar - whole knitted or stitched. In this case, you can choose the direction of knitting - from bottom to top or in the direction perpendicular to the shoulder seams.
Full knit shawl collar
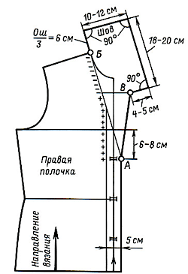
This option involves the collar being shaped above the button placket. It is knitted on the right and left shelves, forming two symmetrical parts. On the back side of the neckline, the vertical edges of the collar are stitched using a kettel or chain stitch. The edge adjacent to the neckline is sewn with a chain stitch or a backstitch. A special pattern for such a collar is not required. It is usually knitted in the same pattern as the placket, or in garter stitch.The pattern of the right front with a solid knitted shawl collar made in this way is shown in the figure.

To complete such a detail, proceed in the following sequence:
- The first thing to knit is the front on which there will be buttonholes. Work starts from the bottom edge of the product in an upward direction. After knitting the topmost button loop, knit another 1 cm and begin to form the shawl collar. So that it lies beautifully and does not tighten the product, it is optimal to start this 6-8 cm below the armhole line;
- Continuing to knit, before and after the strap, make uniform increases using crossed (collected from a broach) loops. In this way, a smooth expansion of the knitted fabric is formed. The number of increases and their rhythm depend on the density of the knitting and the pattern. Having reached the midline between the armhole line and the upper shoulder line, the increases are stopped and proceed to the next stage of work;
- Next, it will be necessary to make decreases between the bar and the main fabric of the product. At the beginning of this stage, additional loops are cast on from the edge of the collar (thus forming a lapel) or continue knitting without increases. The rhythm of the decreases is determined taking into account the density of the knitting so that only the collar loops remain on the knitting needle at the level of the top point of the shoulder. After this, they move on to the final stage of work;
- after the top point of the shoulder they work only on the collar loops. Knit a straight fabric to a height equal to 1/3 of the neck circumference. At this point the work is put off. If you plan to sew the halves of the collar together with a quilt stitch, the loops are left open; to connect the parts with other seams, they are closed.
The second shelf is knitted symmetrically. After this, the upper edges of the collar parts are sewn together, and the free edge is stitched to the neckline.
Knitting in the cross direction
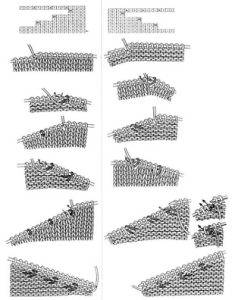
For this method, first knit the front and back parts and sew down the shoulder seams. The loops are cast on along the edge of the neckline, starting 1 cm above the top button, moving along the edge of the shelves, along the neckline of the back and further along the edge of the second shelf, completing the cast-on at a level symmetrical to the beginning of the work. To form a shawl collar, knitting in short rows is used. The diagram is shown in the figure:

Knitting in short rows means that at the end of each row several stitches are left undone, the work is turned, and in the next row the same number of last stitches are left unknitted. Thus, all the loops remain on the knitting needle, but the number of stitches involved in the work becomes less with each row.
Due to this, a smooth symmetrical rounding of the edges of the collar is formed. The rhythm of the decreases is calculated taking into account the knitting density and pattern. After the fabric has reached the required width, all the loops on the knitting needle are knitted in the last two rows.
Stitched shawl collar
The necessary patterns and diagrams do not differ from how a solid knitted “shawl” is formed. But for the stitched version, the part is knitted separately, checking the pattern. After the collar is knitted, it is stitched along the neckline.
A one-piece collar is an option more suitable for experienced knitters. In order for the collar to fit beautifully, you need to be able to make accurate calculations. In case of an error, you will have to unravel and re-tie not only the collar, but also part of the front.
The stitched “shawl” is optimal for beginners. This is a relatively small detail.If the first option turns out to be unsuccessful, it is enough to re-knit only the collar, without correcting anything on the remaining parts of the product.


 0
0


