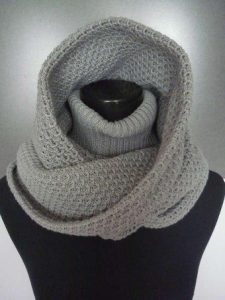
A knitted scarf-hood is a universal headdress that looks good on both adults and young ladies. The knitting pattern is quite simple, so you can spend a minimum of money and time and get a stylish and original product. You can wear it in the cold season and in the off-season.
Pattern options
Taking into account the weather outside, the density of the scarf-hood will depend. If the needlewoman skillfully connects all the elements of the fabric, then the scarf can be made double-sided, using a pattern with the same design on the front and back sides.
To make the product have a more impressive appearance, you can make it according to a one-sided pattern. If you plan to knit tightly, it is better to use a honeycomb pattern. If the yarn is of medium thickness, then knitting with stockinette stitch in tandem with voluminous braids will look interesting.
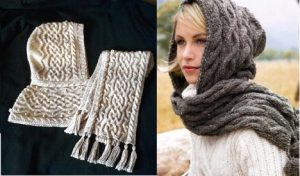
The length of the scarf-hood can be absolutely any. It all depends on the girl’s personal preferences. Sometimes they are long enough to tie a scarf at the back of your head.The hood can be centrally located or offset to one side. In the second case, you will have to wrap a long element of the scarf around your neck.
Benefits of a knitted hood
A homemade scarf-hood, knitted with your own hands, has a number of advantages:
- there is no need to wear a hat;
- excellent weather protection;
- the ability to adjust the length and color of the product at your own request;
- possibility of execution in any version;
- a wide variety of patterns and yarns, which differ not only in color, but also in thickness and composition.
Scheme of a universal scarf-hood
To create this product, you need to know the average head circumference. The work will also require the following materials and tools:
- yarn (wool and mohair) – 500 g each;
- circular knitting needles No. 4 and straight knitting needles No. 4 – 4 pcs.
Procedure:
- Cast on the required number of stitches on circular needles.
- Knit 10 cm of fabric with a 1x1 rib using the pattern of 1 knit stitch and 1 purl stitch.
- Decide on a pattern. If it is the most common, then use the following pattern: 5 purl loops, 5 knit stitches. On the reverse side, knit knit stitches in purl stitches, and purl stitches in knit stitches. And although this pattern is done very simply and quickly, it looks quite voluminous. Decor such as beads will help make it original. Also a good option is to introduce an additional thread into the knitting of the main thread. This could be a gold decorative thread.
- As you create the canvas, you need to try on the top of the hood so that it fits. When the required length of the crown is reached, the knitting is conditionally divided into 3 parts with an equal number of loops. Transfer them all to straight knitting needles.Count the number of loops to the middle in advance and make a mark with thread.
- From the first row of the completed division, knit a row and bind off 1 loop each: take the last loop of the first knitting needle together from the first second part, and the last loop of the second knitting needle from the first third part. Further knitting occurs along the pattern. In the third row, close the loops using a similar pattern.
- When the back part is finished, you can take out the loops to form a scarf.
- Knit the collar bottom using the stocking method, adding 1 loop in each row. Upon completion of the work, connect the ends of the rows and try on the product again.
- Now you can work on the neck. To do this, continue knitting the main pattern. The neckline is made along the length of the neck.
- Close the loops in the traditional way, pull the previous one through the next loop.
- Decorate the finished product with a pompom.
The resulting scarf-hood will not only be an excellent addition to your look, but will also protect you from bad weather.
 0
0