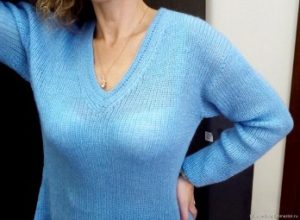
The V-neck is an option that is always timeless and fashionable. It remains relevant in every season. This type of neckline does not have strict restrictions on gender: it can be found on both men's and women's clothing. It also does not have a clear framework for styles: it is used by craftswomen both for sophisticated evening models and for simpler, even sporty ones.
How to cut stitches correctly when making a V-neck
You should start knitting by dividing all the loops into two equal parts. In this case, if the total number of loops is not completely divisible by 2, the loop in the middle must be closed. Next, the loops will close evenly. This can be done in two ways:
- Simple shortcut. Its peculiarity is that the loops close near the border of the neck. To do this, the edge loop and the loop following it are knitted together. The total number of loops is decreased once every 4 rows.
- Complex abbreviation. In such cases, the loops are closed once every 8 rows. On the right, knit to the end of the row in the usual pattern, leaving the final 6 loops: knit 3 loops together, 2 semi-patent elastic loops and an edge loop. For the left side of the neckline, transfer the edge loop to a working needle and knit 2 loops with a semi-patent elastic band. Then drop 1 loop, knit two as one and pull the first through them.
To form the right front, knit the last 2 stitches together as one knit stitch.
For the left side of the collar, the first loop is dropped as a knit stitch, the second is knitted and pulled through the first. It turns out that the loops are knitted at an angle. Next, knitting continues according to the selected pattern.
This option will not work if the pattern is a patent or semi-patent elastic, since the shortening of the loops will occur either on the front or on the purl loops.
Decrease with noticeable loops
This method is more convenient, since after it it will be easier to cast on loops for knitting binding. In this option, loops separated by several loops from the edge of the cutout are closed.
For the right side, leave the last 4 loops in every fourth row. Of these, knit 2 loops together as a knit stitch, 1 knit stitch and 1 edge loop.
The left bevel of the neckline begins with 1 edge and front loop. The 2 loops following them are knitted together: the first loop is dropped as a knit stitch, the second is knitted and pulled through the first.
The second option for decreases can also act as a decorative design. Due to the indentation from the edge, an inclined path is formed. To do this, first two loops are knitted together with a slope, as described above, and only then the two loops following them are knitted.
Trim for V-neck
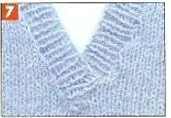 There are several options for designing a cutout. The simplest option is knitting with an elastic band: knit 1 * purl 1. To do this, cast on loops along the edge of the collar on circular knitting needles and knit an elastic band on them. At the beginning of even-numbered rows, add 1 stitch. Having reached the desired width of the binding, close all the loops and sew its ends as shown in the photo.
To form a symmetrical binding, the loops need to be reduced in the middle part of the front. It is also knitted by alternating 1 purl and 1 knit stitches. In even rows before the middle, knit the last two stitches together.
The binding can also be made with a 2*2 elastic band. In this situation, the middle front will consist of two knit stitches. In every second row, leave 1 stitch in front of the middle two. Knit them together with knit stitch. Knit the next two loops with a slant to the left.
When knitting binding for fabric with a relief pattern, it is important that the borders are processed as inconspicuously as possible. On the circular ones, cast on the loops and knit 1 row with an elastic band 1*1, then close them all.
 0
0