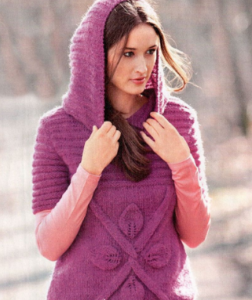
Knitted vests are a popular wardrobe item as they can be used at any time of the year and in various situations. If you're looking for a project for your next knitting project, a crochet hooded vest might be the perfect choice. In this article we will look at how to crochet a knitted vest with a hood, provide patterns and step-by-step descriptions that will help you create a beautiful and cozy wardrobe item.

Preparatory steps
Before you start knitting a vest, you will need certain materials and tools. To knit a vest with a hood, you can use different types of yarn, but it is best to choose a soft and warm yarn so that the vest is comfortable to wear. Choose a hook suitable for the selected yarn. In addition, you will need a set of needles, scissors and markers.
To crochet a vest with a hood you will need the following tools:
- Hook – Choose a hook based on the thickness of yarn you plan to use. Usually a hook size of 3.5-5 mm is used.
- Yarn – Choose a yarn that suits your preferences for thickness, color and composition. It is best to choose a yarn that is soft and pleasant to the touch and will hold the shape of the vest well.
- Scissors – for cutting yarn and finishing the project.
- A needle with a large eye is for side seams and sewing on a hood.
- Sewing needle - for sewing on finishing details such as hems and buttons.
- Markers or pins - for marking and securing parts of the vest before sewing.
Depending on your preference, you can also use other tools such as a measuring tape or a hook helper. However, the tools listed above are basic and necessary for the successful completion of the project.
Vest knitting pattern
Before you start crocheting a vest with a hood, you need to decide on a pattern. The diagram shows which stitches you should knit and when. There are many patterns that can be used to knit a hooded vest, but in general they involve the basic steps of back, front and hood. The diagram usually shows how to place the loops and how to knit them.
Step by step description
Start at the back of the vest. First, knit a chain in a quantity that corresponds to your size. Then single crochet a row and repeat until the back reaches the desired length.
Knit the front piece using the same pattern as for the back piece. However, the front needs to be wider, so you will need to add a few extra loops on the sides.
Connect the back and front of the vest to create the side seams.
Knit the hood using the same pattern as for the front and back of the vest. The hood should be large enough to fit well to the head and protect from the cold. You can adjust the size of the hood by adding or removing loops to suit your preferences.
Once you have knitted all three vest pieces, join them together to complete your knitted hooded vest. Use a needle and thread to carefully sew up the side seams and hood.
Be sure to add finishing details such as hems and snaps to give the vest a more finished look and enhance its functionality.
conclusions
In conclusion, a knitted hooded vest is a great project for those who love knitting. It easily matches with any outfit and can be worn at any time of the year. Crocheting a vest with a hood is not as difficult as it might seem, especially if you already have some experience in knitting. Follow the diagram and step-by-step description to create your own unique vest that will decorate your wardrobe. Plus, you can experiment with different yarns and colors to create a unique style for your vest. Don't be afraid to get creative with your project and have fun with the knitting process!
 0
0