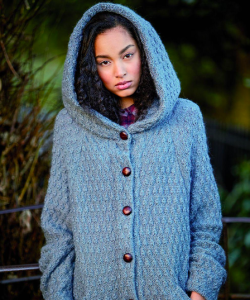
Knitted coats are amazing for fall. Coats and cardigans are at the top of their popularity this fall, and this coat with a border and a hood will not only save you from the cold, but also embellish your appearance.
You will need: cashmere yarn, natural wool, pale grayish threads, knitting needles, ring needles, buttons.

Knitting patterns:
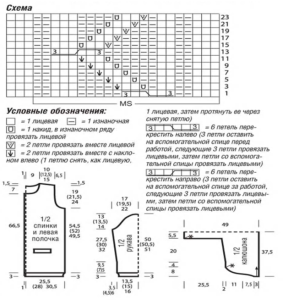
- Elastic band A (unpaired number of loops). After the initial layer or set of loops, start with 1 purl stitch: edge stitch, alternately 1 purl stitch, 1 outer stitch, finish with 1 purl stitch and also an edge stitch. In the outer layers, the loops are knitted according to the drawing.
- Elastic band B (5 + 4). Outer circles: 2 outer, * 2 purl, 3 outer, repeat continuously, finish with two purls. Purl circles: knit loops according to the picture.
- Elastic band C (5 + 4). Outer circle: purl 2, * external 3, purl 2, finish with external 2.
- Bevel pattern (21 + 3) = look at the diagram. It shows the outer circles. In purl.In circles, all loops without exception are knitted according to the pattern. Repeat the pattern continuously. Repeat the 1st-24th round regularly.
- Outer surface = outer circle - outer loops, purl circle. Knitting intensity: patterns 4 – 2, 3 -21 p. x 25 r. = 10×10 cm.
Let's start knitting
Back: 107-127 loops, combine strips 3 cm = 7 layers. starting with 1 purl. layer. Chrome. 9, 19 p., 87 p. with pattern 4, 9, 19 p. with pattern 3, edge. Using 54.5 cm = 136 layers, 49.5 cm = 124 layers from the placket, close for the armholes on both edges 1 x 4 p., close 3 x 2 p = 79.99 p. Using 73.5 cm = 184 layers, close for the purpose of the shoulder bevel, 1 x 7, 11 p. and in the subsequent 2nd layer 1 x 7, 10 p. Synchronously, together with the 1st decrease for the shoulder, close 31 p. for the neck. For the purpose of rounding on the inside. close the edge in the next 2nd layer 1 x 3 p. 75 cm = 188 layers from the strap close 7-10 p. shoulders.
Pocket base: 25 stitches and knit pattern 3, start with 1 edge, knit 3 outer stitches alternately. Purl 2, finish with 3 outer stitches, 1 edge stitch. Using 14.5 cm = 36 layers from the original layer, save the loops.
Left shelf: 56 - 66 loops and combine 3 cm - 7 layers of rice. 1, given in the 1st purl. layer, after the edge, start with 1 purl and finish with 1 outer one, as well as an edge. Next: edge, 9 -19 p. Figure 2, 45 p. Figure 4, edge.. For the purpose of the pocket strip, using 13.5 = 34 layers from the strip, continue working in 19-41 and loops, 29-51 Fig. 1. Enter the pocket with 16 cm = 40 layers from the strip, close 23 stitches of the pocket strip according to the picture. In the next purl layer, enclose the loops of the pocket lining in the pattern instead of closed loops, knit the pocket lining with adjacent loops together in the pattern, the remaining 23 stitches.Insert pocket linings into Figure 4.
Right shelf: mirror knit, exactly the same as the left side, no need to change anything!
Sleeves: 58 – 66 loops, and also for the purpose of the placket, combine 3 cm = 7 layers of rice. 1. Next: edge stitch, 7 – 11 stitches with pattern 2. start with purl 2. and 3 outer stitches, 45 stitches with pattern 4. 7 – 11 stitches with pattern 3, and start with purl 2, edge stitch. Using 9.5 cm = 24 layers – 5 cm = 12 layers, add 1 x 1 p. to bevel the sleeves on both edges, then in every 10th layer 6 x 1 p. in any 6th layer 12x1 p. and first insert loops into Figures 2 and 3 in accordance with this, and after that, once a sufficient number of increases have been achieved, increase Figure 4 from two edges = 72 - 92 p. Using 37 cm = 92 layers, close to roll up the sleeves 1 x 4 p. Using 50 cm = 124 layers, 51 cm = 128 layers from the bar, close off the remaining 18 - 30 p.
Hood
Start at the edge of the neck = knitting guide. Cast on 6 loops on the knitting needles and knit in the following way: edge, 5 sts, pattern 4. For a bevel along the left edge, cast on 5 x 4 sts in every 2nd layer from the initial layer. Enter the initial 16 increases in pattern 4, knit the remaining 19 increases pattern 5 = 41 p. After the final increase, weave a mark into the left-hand edge, also on the pattern. After 12 cm = 30 layers from the original layer, add 1 x 1 p. according to the left edge, 16th layer 2 x 1 p. pattern 5 = 44 p. To bridge the hood, after 32 cm = 80 layers from the original layer, dial on the left edge 1 x 43 p. and knit with pattern 5 = 87 p. After 5.5 cm = 14 layers from the base of the jumper knitting or through 37.5 cm = 94 layers from the initial layer, the middle of the hood is reached. Finish the hood in a mirror image.


 0
0


