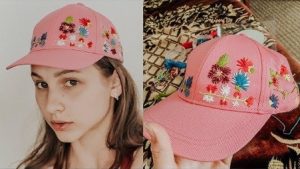
The baseball cap has become a part of our lives. Now it is worn not only by basketball players, but also by ordinary adults and children. It not only protects us from the scorching rays of the sun, but also adds completeness to any sporty look. In this article we will talk about what embroidery on a baseball cap is and how to do it at home, without going to a studio.
Baseball cap design
Caps are made from different fabrics, so they can be velor, denim, cotton. Each fabric requires its own technique for applying the logo.
To apply a standard logo size, on average, up to 8 shades of thread are required, moreover, there are threads that glow at night. You can also apply 3D embroidery, which gives the design a 3D effect (volume).
Place for embroidery
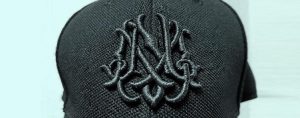
Embroidery can be applied to one of four parts of the cap: front (frontal), back, left or right. A small, neat design will look good on the front and middle of the cap.If you decide to place it on the side, it is better to place it both on the left and on the right, so that symmetry is maintained from any angle. From the back of the cap, the design is best placed above the cap size adjustment strap.
The placement of the inscription on the visor itself will also look original.
In any case, the person who will wear it makes the decision himself where the inscription will be located.
Embroidering a design on a baseball cap in the studio
The studio has modern, specialized equipment that easily creates not only the design on the cap, but also the cap itself. Why is it convenient to contact a studio? Because the equipment, with the help of built-in programs, does its job accurately, accurately and quickly.
When contacting the studio, the drawing is finalized by the designer and placed in the machine, and the machine performs all the steps prescribed by the working master.
The master sets parameters for the machine: thickness, color and type of thread, and other characteristics, places the baseball cap on an oval shaft, and the machine needle applies an inscription to the baseball cap along an arcuate curve specified in the hardware settings.
Equipment must be regularly updated to ensure that all customer requests are taken into account during application.
Do-it-yourself embroidery pattern
Embroidering a design with your own hands is an entertaining and at the same time simple process. First you need to prepare the materials and tools according to the list:
- cap;
- scissors;
- dense threads;
- needle;
- stencil;
- cardboard lining;
- hoop.
Step-by-step guide for DIY embroidery:
- First, wash the cap so that the design fits better on the material.
- At the second stage, find the drawing you need on the Internet or draw it yourself.
- Next, take carbon paper and carefully transfer the design onto the cap.It is important to be careful, because if it is applied incorrectly, there will be no opportunity to correct it, since the carbon paper cannot be washed off.
- Then take a needle with thread and small neat stitches and begin to sew with satin stitch inside the design space.
Important: use a hoop, they will help fix the product to avoid slipping in your hands.
- Finish the cap: trim off the excess threads.
- At the last stage, decorate the inscription with fur or beads (optional).
Important! When working, use only high-quality materials. Thus, an inscription made with low-quality threads will begin to diverge after the first wash or lose its brightness.
The quality of the threads is checked by immersing the threads in warm water. If the water is colored, set them aside and do not use them for work.
Carry out embroidering in a bright place, as otherwise your eyesight may be damaged.
Wash a cap on which a logo is applied at home with gentle powders, preferably liquid, at low speeds and temperatures below 80 degrees.
If there are difficulties with the sketch, you can turn to special programs. Anyone can take a stencil and remake it in the editor to suit themselves. One of these is SmoothDraw. It has a simple and user-friendly interface, even designers turn to it. There is also a service called Krita, which is a virtual drawing game for adults and children.
Embroidering a baseball cap is easy and quick to do in a studio, but if you like to experiment and have a little time, why not try it yourself at home? After all, almost all the tools to perform this process are available in every home.With a little experience, after a few hours of work you will have an exclusive baseball cap that will delight you every time you pick it up and put it on. Creative success!


 0
0

