Embroidery is a fairly ancient type of needlework. The fashion for this type of creativity comes and goes. But it’s no secret that this activity calms the nervous system, develops fine motor skills, promotes perseverance and accuracy, develops taste, and simply brings real pleasure. And the finished products give true satisfaction and delight your friends and family.
Embroidered flowers look especially beautiful. Today we will look at how to embroider a mimosa.
Everyone associates this flower with spring and looks like a joyful sun.
Mimosa came to us from Australia. It is also called silver acacia. This is a fast-growing tree belonging to the evergreen family. It begins to bloom in winter, and by the beginning of spring it pleases us with its beauty.
So, mimosa embroidery can be done in various ways: satin stitch, cross stitch, ribbons, French knot.
Today we are embroidering mimosa with ribbons and cross stitch.
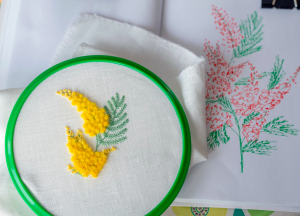
Ribbon embroidery – mimosa
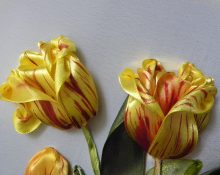
Mimosa is a true symbol of spring. And using the technique of embroidery with ribbons, it turns out especially beautiful and elegant.
What we need:
- The fabric is canvas with a dense weave of threads.
- For flowers: narrow satin ribbons, 3.5 mm wide, yellow (you can take 3-4 different shades of yellow to get a more voluminous image).
- For leaves: satin ribbons, 7 mm wide, in three shades of green.
Let's take a step-by-step look at how to embroider mimosa with ribbons:
- We find the desired scheme.
- We fix the canvas in the hoop.
- We apply the design to the material with a water-soluble marker and sew its contours with a basting stitch.
- We sew flowers on each mimosa branch with different colors of ribbons, creating iridescence. We use a stitch called “colonial knot”.
- We lay the thin stems of the plant with a thread of floss, folded in half.
- We make the branches with a twisted ribbon. To do this: unfold the ribbon with the shiny side down, coat it with PVA glue along the edges on both sides. Place a knitting needle inside and roll it into a tube. Press. Remove the knitting needle.
- We make the leaves in three shades of green using a twisted ribbon stitch.
- Having stretched the product onto the cardboard, we fasten it with thick threads from the wrong side.
- We insert it into the frame.
Our work is ready. As you can see, there is nothing complicated here, and the result is very impressive.
Cross stitch – mimosa
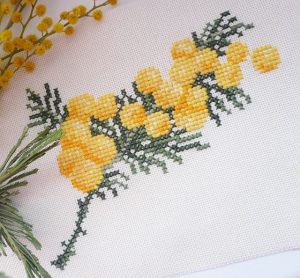
Now let's look at how you can embroider this cute flower with a cross.
Instead of ribbons, we will need floss threads for this work. Take 3 shades of yellow and 3 shades of green. Of course, you can embroider with one green and yellow color, but then the design will look flatter and the flowers will not give a three-dimensional image.
Everything else is the same as when embroidering with ribbons.
- Prepare the canvas: cut out the desired size, finish the edges with a blanket stitch.
- Using a water-soluble marker, mark the material with 10x10 squares to make it easier to transfer the design.
- Transfer the pattern and sew the design along it using a basting stitch.
- Start embroidering from any angle you like. It is important that all the cross stitches go in the same direction.
- When finished, wash the product in soapy water to remove the markings. Dry and iron from the wrong side, placing your face on a terry towel.
- Place it in a frame.
Such an original product will surely decorate the room and delight your guests. And it will delight you for many years, bringing comfort and warmth to your home, and also adding zest to the interior of your home.
 0
0