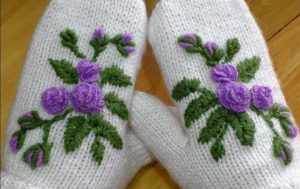
For what purpose are knitted mittens embroidered in various patterns? In order to make them unique, beautiful, individual and original. You can please yourself with this product or give a gift to your children, family and friends.
You can choose any patterns. In winter, crafts with winter motifs - snowflakes, bullfinches, rowan - look especially cute. But embroidery with flowers or patterns will also look attractive.
How to embroider a design on mittens knitted with knitting needles – we’ll look at this in this article.
- Let's select the threads - the thickness of the thread should match the yarn with which the mittens were knitted.
- It is better to take a special tapestry needle with a blunt tip.
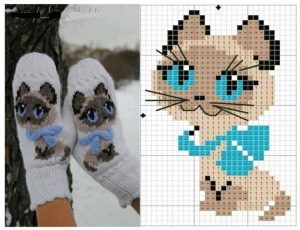
- Let's prepare a diagram of the future pattern.
- When working with beads, use a special Luneville hook. This will keep the yarn of the mittens intact. Choose strong threads that match the color of the mittens. Use a stem or chain stitch to attach the beads.
- When embroidering with satin stitch, transfer the pattern onto tracing paper, carefully trimming the edges.Attach it to the product and sew around all the contours of the pattern with a thread. Remove the sheet of tracing paper and start embroidering. Place the stitches close to each other. And if you place the stitches horizontally in the first layer, and vertically in the second, you will get a very beautiful and more voluminous pattern.
- When embroidering “in loops”, prepare a diagram. One cell of the diagram will correspond to one “tick” on the mitten. Insert the needle from the wrong side and pull it up, pulling it out where the “i” will fork. Stick the “ѵ” into the top of the half and pull it out at the top of the 2nd half. Pull the thread. This will be the 1st stitch.
We insert the needle into the place where it was pulled out for the first time on the face. The first element of your drawing is ready.
Cross stitch mittens
You will learn how to embroider mittens with your own hands using the “cross” technique from our article.
To embroider on knitted mittens, a cross must be made through 2 loops and 3 rows of stocking stitch. Then it will have the shape of a square.
If the mittens are not knitted, but fleece or felt, it is more convenient to embroider patterns on the lining canvas. This is a special rare fabric that, when finished, can be easily disassembled thread by thread and removed.
How to embroider on mittens using lining fabric:
- Using small stitches we baste it to the fleece mittens.
- We calculate the pattern by cells.
- In order not to accidentally grab the other side of the mitten, we put cardboard inside it and begin to embroider the pattern with floss threads.
- Upon completion of the work, starting with the transverse threads, we begin to pull out the threads of the canvas.
- Let's move on to the longitudinal ones.
We got perfectly embroidered mittens with our own hands.
People often ask how to embroider snowflakes on mittens. This is one of their favorite winter-themed patterns.It is quite simple, as it is done in one color. Its size is standard: 35x35 crosses. There are a lot of snowflake patterns.
Embroidering a snowflake on mittens is quite suitable for beginning needlewomen. It is placed in the center of the mitten, embroidered with a white cross on the darker background of the mittens. If desired, it can be decorated with sparkling beads, glass beads or metallized thread.
If you are wondering how to embroider mittens beautifully, then satin stitch embroidery using ribbons is for you.
How to embroider mittens using satin stitch using ribbons
Excellent embroidery on mittens on the front surface is obtained using this technique. The pattern turns out to be very unusual, voluminous, and very simple to do.
We will need:
- Mittens;
- Thin burgundy satin ribbons;
- For satin stitching - brown threads;
- Felt pieces;
- Tapestry needle with a large eye and a rounded tip.
Embroidery on mittens for beginners is done like this:
- We select a diagram or draw it ourselves. In our case, these will be 2 small roses, each surrounded by six leaves.
- First, we outline the middle of our roses.
- We cut out small leaves from felt fabric and fasten them with pins around the future roses.
- We sew felt leaves with satin stitch. The stitches should go from the center to the end of the sheet on the right side and the same on the left.
- From the center of the rose, draw 5 rays at the same distance from each other - the ribbon will hook onto them.
- We fasten the ribbon in the center of the rays and begin to wind it, catching it by a thread, one after another. It turns out to be a rose.
- You can sew a bead into the center of the rose to match the color of the ribbon. The leaves are also decorated with a string of beads placed in the center of the leaf.
Mittens with such embroidery turn out amazingly beautiful!
Mittens with voluminous embroidery
A stunning look of volumetric embroidery - in the Rococo style. The technique is based on winding a thread around a needle.
To make the pattern:
- A needle is brought out from the wrong side to the front side, around which we wind the thread in 5 circles. This winding is held with a finger, a needle and thread are inserted into it, and fixed with a stitch from the inside next to the previous puncture. This element is called a "knot".
- The next loop is done the same way.
- Then all the curls are straightened with your hands.
If you stick a needle with a wound thread not into another point, but into the one from where it came out, then the pattern will turn out to be more pronounced, looped. To make a flower, you need to make 7 such loops.
The “petal” element - everything is done as in a “knot”, but the winding must have at least 12 turns. The second point where you need to stick a needle with a wound thread is equal to the length of the petal. There it needs to be brought inside out and secured.
The “berry” element is to draw a thread onto the face and make a puncture at the height of the future berry. It is necessary to pierce the fabric a second time in the place where the needle originally came out. Do not pull the needle out, but pull the thread out of it and wrap it around the tips of the needle. We perform the last turn with a figure eight. We insert the thread back, holding the rings with a finger, and fasten it from the face and from the inside of the fabric.
If you embroider mittens with woolen threads, this will also add volume to the pattern. Since woolen threads are in most cases quite thick. To further increase the volume of embroidery, pieces of padding polyester are used. It is placed under the pattern and covered with satin stitch.
This is a very exciting activity - do-it-yourself embroidery on mittens; patterns for patterns are in our article and on the Internet.
To complete the task, you do not need any special materials or conditions.Remains of multi-colored threads can be found in the arsenal of every needlewoman. And the result of your creativity will be a unique thing that will delight you and your loved ones for many years.


 0
0