The history of ribbons goes back several thousand years. A style of ribbon embroidery similar to the one used today originated in the 18th century in France.
The ladies of the royal court of those times loved to decorate their outfits and underwear with elements of this embroidery. Each outfit was truly a masterpiece. They were sewn and decorated in special ateliers, which were given the proud title of “suppliers of the royal court.”
Soon, ribbon decor spread throughout the world and reached a particularly magnificent flowering in the 70s of the 19th century. Back then, almost everything was embroidered with ribbons: umbrellas, paintings, hats, lampshades, clothes, etc.
But soon a crisis broke out - the 1st World War. The romantic style, which implies a variety of decorations, is a thing of the past. Women of that time began to strive for emancipation; they had no time for decoration.
But recently, famous designers have once again remembered forgotten handicrafts. Nowadays, decorating with ribbons is deservedly returning to our lives and is becoming very popular.Millions of women master this embroidery technique.
In addition, to create more natural canvases in needlework, paints began to be used to give elements a natural volume and the necessary shades.
In our article we will look at how to make tulips embroidered with satin ribbons.
Ribbon embroidery - tulips for beginners
Embroidering tulips with satin ribbons is not as complicated as it seems at first glance. Sewing with ribbons is a fairly simple task. It does not require special expensive devices and materials, and you do not need to be an ace in needlework. You just need to want it, show some perseverance, and your unique work is ready.
How to embroider tulips with ribbons, we present a master class of this process in this article.
So, ribbon embroidery - tulips, master class. To complete the task, we will need:
- A piece of material for the base 25x30 centimeters.
- Gabardine needle with a wide eye (chenille), but a sharp tip.
- Satin ribbons, 2 colors, 12 mm wide. If you are interested in ribbon embroidery - yellow flowers, choose one yellow ribbon. The second is in the color of green.
- Sewing threads to match the color of the ribbons.
- PVA glue.
- A piece of thick cardboard.
- Hoop.
- Frame for the product.
Tip 1:
Before use, the fabric must be washed and ironed - this is done to avoid shrinkage of the material.
Tip 2:
We cut the tape only diagonally. We take 30 cm pieces and insert a needle at a distance of 6 mm from the edge.
Tip 3:
Try to make tulips of different shapes and slightly different sizes. The more the flowers differ, the more natural they will look.
Let's get started: ribbon embroidery - tulips, master class for beginners.
Ribbon embroidery - a bouquet of tulips, consists of 2 stages:
Making a flower - the first stage:
- After preparing the material - the base, apply a drawing diagram to it.
- Hoop it.
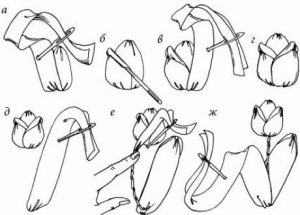
- From the wrong side, insert a needle and thread into the top of the top tulip.
- Make the next puncture at the bottom of the petal from the face to the wrong side.
- Having retreated about three millimeters from the puncture, pull the needle back onto the face of the product, straighten the ribbon with the tip of the needle at its base, and make the next petal, laying it on top of the previous one. So embroider all the tulip petals. Just don't tighten the ribbons. The petals should lie freely, slightly curved. This is how you get a closed tulip bud.
- If you want to make an open tulip, first lay out two side petals so that the overlap is minimal. And then sew the third, top one, which will partially cover the previous two. This way the flower will look more natural.
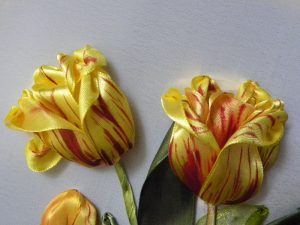
Ribbon embroidery – tulips, photo
Making twigs and leaves is the second stage.
Embroidering tulips with ribbons involves making not only flowers, but also branches and leaves. Let's see how they can be done:
- Take a prepared 12 mm soft green satin ribbon, 8 cm long, and cut it, making a smooth edge. Wrap the ribbon onto a needle, twisting it into a tube and carefully sew the edge with simple threads to match the color of the ribbon. When attaching the stem to the fabric, try to turn the stitch down.
You will need 9 stems in total. - Secure the stem to the fabric, and secure part of the green ribbon with a tapestry needle with a sharp end in the direction of the future leaf. Do this with all the leaves. Fasten them with bends and place them in random order. This will give a natural look to your product.
- So make the whole bouquet, and at the bottom of the interlacing of the stems, tie them with a ribbon in several layers and secure. Your painting is ready.
Ribbon embroidery - tulips, master class gives beginning needlewomen the opportunity to learn this type of embroidery.
Ribbon embroidery for beginners step by step - tulips - a very exciting activity.
You are convinced that embroidering tulips with ribbons, the master class shown above refutes the opinion that this is a very difficult process. You can embroider tulips with ribbons without much effort.
Ribbon embroidery for beginners step by step - tulips, photos of products are presented on our website.
Tulips embroidered with ribbons - paintings are subject to final design and placement in pre-prepared frames.
Pictures with ribbons - after production, tulips are fixed on a sheet of thick cardboard. To prevent the fabric from moving, it is pinned with clothespins or clamps. From the wrong side, using a cord, the painting canvas is stretched horizontally and vertically.
The tulip embroidery is then inserted into the frame. Glass is not used in this frame so as not to press down the three-dimensional pattern of the canvas.
How to embroider a tulip with ribbons using tinting
Recently, many have fallen in love with using paints to make embroidery even more natural. Tulips embroidered with ribbons are no exception. They can also tint the background; they can be given greater volume and naturalness with the help of paints.
Acrylic paints are used for this purpose. The process is not complicated, but the result is impressive.
To tint the background, just dilute the paint and go over the fabric with a fan brush. And to tint flowers - shade them with a darker color at the bottom of the stem. They will immediately become more realistic and natural.
Tulips embroidered with ribbons, the master class of which we reviewed, will not leave anyone indifferent. Such embroidery can truly be a real masterpiece.
 0
0