Cross stitch is one of the most popular women's hobbies. This type of needlework appeared a long time ago - back in the primitive age, but it gained particular popularity with the advent of Christianity, when women began to decorate icons with embroidered towels.
Nowadays, this is more of a hobby for the soul, a popular hobby.
Embroidery is a truly unique type of needlework with which you can create real masterpieces. Each embroidery is unique and unique.
To understand the process of cross stitch, let's look at it using the example of rosehip embroidery.
First we need to decide on the fabric for embroidery. What materials are suitable for this purpose. It should be inelastic fabric, and in order for the crosses to be even, in 1 centimeter the number of longitudinal threads should be equal to the number of transverse ones. The following materials are used for cross stitch:
- Linen;
- Fabric – canvas;
- Water-soluble interlining;
- Uniform weave material;
The most commonly used is canvas.It is a canvas divided into squares with holes in the corners. The most widely used canvas is “Aida” from the German company Zweigart. Different types of Aida canvas are designated by different numbers:
- Canvas No. 18 - used by experienced needlewomen. Portraits are embroidered on it;
- Canvas No. 14 - very suitable for embroidering bright still lifes or beautiful landscapes;
- Canvas No. 11 – indispensable for embroidering tablecloths, paintings, pillows and other things;
- Canvas No. 7 – for beginner needlewomen, for children’s creativity. It has large holes, which greatly simplifies the work.
It should be noted that the smaller the cell size on the canvas fabric, the more beautiful the embroidery turns out.
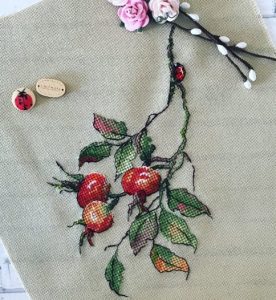
So, rosehip cross stitch with a perfect reverse.
We offer a master class with photos below. This embroidery is used when the reverse side is visible in the finished product.
We will embroider with floss using 2 warp threads.
- First you need to study the diagram to understand where the thread comes from and where it goes.
- We secure the beginning with a loop. We do this: we cut off a longer thread than necessary, and release one thread from it. We hook one thread on the fabric and bend the floss thread in half.
- We perform a half-cross located at the top, then at the bottom.
- We go down again. Let's make the right branch.
- The thread ends - we secure it by pulling it through three crosses. We cut off the end.
- Let's take a new thread. Secure with a loop. We finish the branch we started and go back to where we started. We fasten the thread from the face, tucking it under the three crosses.
- We embroider the leaves on the left side with continuous thread. We start by securing it with a loop and embroider the first sheet.We move lower to the second, without finishing it, we go to the 3rd, stretching the thread vertically on the wrong side into two crosses.
- From the 3rd we go to the 4th, with the same stretch.
- We start with backstitch, which we use to sew a branch near the yellow leaves. We fasten the thread by placing the sheet located on top under the three crosses.
- We embroider backstitch like this: we lay the seam forward with gaps, and backstitch it, covering these gaps. We start the thread with three crosses.
- We make rose hips in the same way.
We got a beautiful and neat product, without protruding knots or threads on the reverse side.
You see, rosehip embroidery is not as difficult as it seems. Examples of embroidery patterns can be found on the Internet. These can be a variety of rosehip wreaths, branches with berries, and flowers. The embroidery process is very interesting, exciting and can be done by any craftswoman.
 0
0