Creating interesting and crocheted items using crochet is an unusual and original activity. It can be considered both as a hobby and as a main source of income. Not only women, but children and even men may be interested in this type of activity. In addition, it is good for health:
- reduces irritability;
- improves fine movements of the hands and fingers;
- increases muscle tone of the arms;
- strengthens psycho-emotional and physical problems.
Crocheted items give the person wearing them a fashionable and stylish look. And if this is clothing created using the patchwork method (sewing an outfit from individual elements), and even with your own hands, then such a thing looks doubly nicer.
Action plan step by step
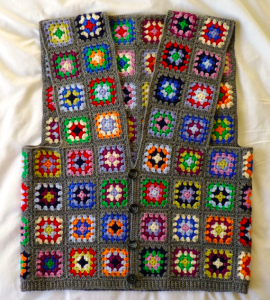
A vest is a garment without sleeves or a collar. It is a practical item that is used in the wardrobe of many people with different values and regardless of age.
This article provides a diagram for making a vest from crocheted squares.
Let's take a figurative size: 42.
Necessary materials:
- 3 skeins of thread, 200 g each (can be plain or different colors, as you like);
- hook number 3.
Making a combination

First of all, we will connect the squares from which we assemble the final version. We knit each row in a circular motion, knitting from separate loops.
- 1st row: we collect a chain of 6 carts. pet. and connect them into a ring 1 tbsp. b/n.
- 2nd row: from 1st st. – 1 tbsp. b/n.; 3 carts pet.; 1 connection Art.; 1 tbsp. s/n.; 1 connection Art.; 1 tbsp. s/n.; 1 connection Art. into the same loop and so on in a circle in 4 loops;
- 3rd row: knit 8 stitches. – 1 tbsp. b/n.; 3 carts pet.; 1 connection Art.; 1 tbsp. s/n.; 1 connection Art.; 1 tbsp. s/n.; 1 connection Art. etc.;
- 4th row: the same, only 12 stitches are used here;
- 5th row: the same, but 16 stitches are used. and close.
One square is ready, size 1010 cm. We knit 88 pieces in this way.
We lay out all the squares on the floor and begin to connect them together. Fold 2 sq. face outwards and, using a hook, fasten 1 tbsp. b/n., using the outer loops. We connect the parts horizontally or vertically (whichever is more convenient for you), not forgetting to leave openings for the neck and sleeves.
We make the back in one piece from 6 sq. vertically and 7 sq. — horizontally, 2 shelves of 3 square meters. wide and 7 sq. in height. We attach the shelves to the back using 5 side squares, and the remaining squares. connect the shoulders. We tie the vest in a circle and wear it with pleasure.
If you prefer vests with sleeves, you can knit them too. To do this, we make another 10 square meters each, connect 2 square meters each. in length and 5 sq. in width. Combine along the length and sew to the vest.
How to diversify the end result
It is possible to experiment with the color scheme: either we do every square.multi-colored, alternately knitting rows of different shades, or we create plain squares, but of different colors, and then sew them in a chaotic order.
Abbreviations:
- sq. - square;
- WHO. — air;
- pet. - a loop;
- Art. - column;
- s/n. - double crochet;
- b/n. - single crochet;
- conn. - connecting.
This item can be worn on a shirt, blouse or even on a robe at home. In any case, you will look great and enjoy resounding success!
 0
0